先下載容器

下載後進行佈署

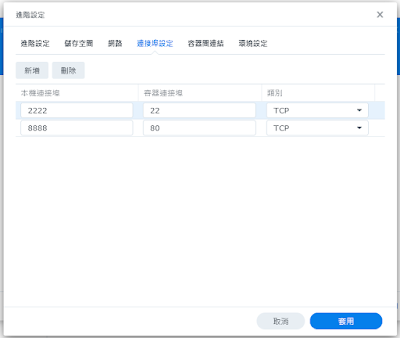
設定80及22的對應連接埠
範本預設沒有安裝ssh
所以要手動安裝


到容器 詳細資料 開啟 終端機
apt update
apt install openssh-server
安裝好執行
service ssh start
docker內無法使用 sytemctl
目前碰到的問題是無法開几自動執行 ssh server
必須每次進終端機 手動啟動
今天在docker 安裝完pbs後要更新出現以下的錯誤
Hit:1 http://deb.debian.org/debian bullseye InRelease
Hit:2 http://security.debian.org/debian-security bullseye-security InRelease
Hit:3 http://deb.debian.org/debian bullseye-updates InRelease
Get:4 http://download.proxmox.com/debian/pbs bullseye InRelease [3067 B]
Err:4 http://download.proxmox.com/debian/pbs bullseye InRelease
The following signatures couldn't be verified because the public key is not available: NO_PUBKEY DD4BA3917E23BF59
Reading package lists... Done
W: GPG error: http://download.proxmox.com/debian/pbs bullseye InRelease: The following signatures couldn't be verified because the public key is not available: NO_PUBKEY DD4BA3917E23BF59
E: The repository 'http://download.proxmox.com/debian/pbs bullseye InRelease' is not signed.
N: Updating from such a repository can't be done securely, and is therefore disabled by default.
N: See apt-secure(8) manpage for repository creation and user configuration details.
解決方法如下
wget https://enterprise.proxmox.com/debian/proxmox-release-bullseye.gpg -O /etc/apt/trusted.gpg.d/proxmox-release-bullseye.gpg
https://pve.proxmox.com/wiki/Install_Proxmox_VE_on_Debian_11_Bullseye#Install_Proxmox_VE
https://forum.proxmox.com/threads/problem-with-repository-and-upgrade.95020/