2024/11/09
2024/03/11
2023/12/10
今天在玩winget
記錄一下在 win11 碰到的問題
內建有安裝但下
winget search notepad 找不到任何東西
要安裝最新版本
https://github.com/microsoft/winget-cli/releases/
目前最新
https://github.com/microsoft/winget-cli/releases/download/v1.6.3133/Microsoft.DesktopAppInstaller_8wekyb3d8bbwe.msixbundle
下載後打開
powersell
add-appxpackage ./下載檔名 才能安裝
直接點二下無法安裝
裝好後無法使用 msstore 資料源
一直出現錯誤
搜尋來源時失敗: msstore
執行命令時,發生意外的錯誤:
0x8a15005e : The server certificate did not match any of the expected values.
winget source reset 也沒用
查了才發現 msstore 憑証有問題 有夠無言
下指令bypass msstore 憑証
winget settings --enable BypassCertificatePinningForMicrosoftStore
或加入以下機碼
Windows Registry Editor Version 5.00
[HKEY_LOCAL_MACHINE\SOFTWARE\Policies\Microsoft\Windows\AppInstaller]
"EnableBypassCertificatePinningForMicrosoftStore"=dword:00000001
winget install 一直跳出 UAC 畫面
安裝 gsudo 解決
winget install gerardog.gsudo
重開几
gsudo winget upgrade --all
或
sudo winget upgrade --all
安裝時還是會跳出 gsudo 的UAC 不過只會跳一次 安裝軟体不會再跳
方便好用的工具
尤其是OS裝完後續安裝軟体
還有更新目前安裝的所有軟体
gsudo winget upgrade --all
winget pin add <package> --version
自動接受安裝合約
--accept-package-agreements
2020/06/28
2018/11/02
最近找到另一個srs 看來也方便的
記錄一下
以下是官方的安裝步驟
Step 1: get SRS
git clone https://github.com/ossrs/srs && cd srs/trunk
Step 2: build SRS, Requires Centos6.x/Ubuntu12 32/64bits, others see Build(CN,EN).
./configure && make
Step 3: start SRS
./objs/srs -c conf/srs.conf
srs.conf 可依需求進行修改
測試的結果在 linux mint 19 x64 上無法編譯成功
在ubuntu 16.04 x64 及 centos 7 x64 是ok的
ubuntu 18.04 沒試
如果要在centos 7上安裝要補一下 rpm
yum install -y gcc gcc-c++ make patch unzip sudo
再來依上述的步驟執行即可
不過要注意的是
執行後會在几器上開三個port 1935 1985 8080
記得用iptables 限制一下
尤其是8080 是web介面
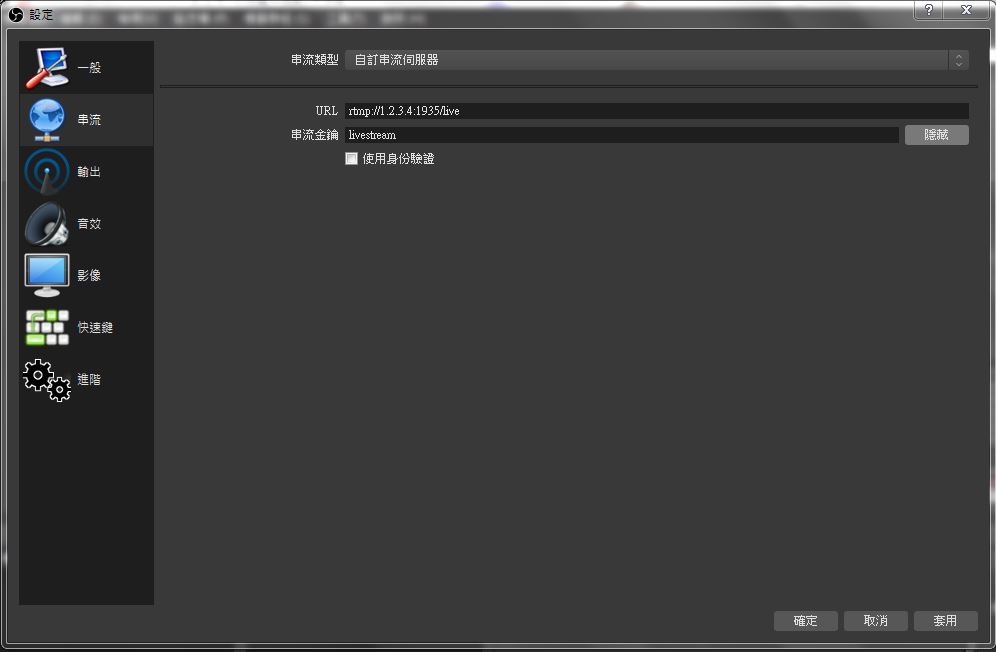
執行完後利用obs把視訊串流上來
步驟參考之前的po文 要改的是串流的url如下圖
改一下server的ip及相關設定
再來使用vlc觀看
vlc rtmp://1.2.3.4/live/livestream
live及livestream對照上面進行修改
目前測試起來 server 上 srs 的 cpu 吃不到 1 %
但obs的串流相當吃cpu 尤其是解析度高的時候
2018/04/21
程式碼是2013年的 用python寫
拿來當陷阱看來還不錯用
拿這個檔來修改
honeyports-0.4.py
預設執行時若偵測到try port的ip
會下iptables 並在畫面上出現訊息問管理者是要列出還是清掉加上的iptables
改一下程式
首先把出現訊息的地方mark掉
再來把加iptables的地方改成寫到log去
另外還有一個就是原作者在連線的回應訊息寫的是
nasty_msg = "\n\n***** Fuck You For Connecting *****\n\n"
這就看個人要不要改了
程式中的這些行因為是直接產生訊息在畫面上
Got connection from
Blocking the address:
Creating a Linux Firewall Rule
I just blocked:
如果不拿掉 在背景執行會有問題
不想拿也可以 就用screen來跑
改完後執行
sudo python honeyports-0.4.py -p 21
-p是監聽的port
可以多執行几次起在不同的port
大於1024可以不需要使用sudo
目前想到的是
21
22
23
137
138
139
445
1433
3389
3306
5800
5900
網卡多bind几個ip
然後.......就可以在log檔拿到這些ip了
接下來要作什麼
自己想
https://github.com/adhdproject/adhdproject.github.io/blob/master/Tools/HoneyPorts.md
https://github.com/ethack/honeyports
2016/03/22
今天來把原先提供下載服務的机器升成centos 7
比較難處理的是原本提供kms認証的部分
几個跟原centos 5不同的地方記錄一下
原本apache用來ldap認証的模組換成 mod_ldap
寫法也有一些改變 範例如下 (novell 適用)
<Directory /var/www/html/test>
AuthName ldap
AuthType Basic
AuthBasicProvider ldap
AuthLDAPURL ldap://test.com.tw:389/o=users?cn?sub?(objectClass=*)
AuthLDAPBindDN "cn=user01, ou=user, ou=people, o=users"
AuthLDAPBindPassword password
Require valid-user
</Directory>
ip forword的寫法也改了
在/etc/sysctl.conf 加上
net.ipv4.ip_forward = 1
重新載入
sysctl -p /etc/sysctl.conf
http://my.oschina.net/fsxchen/blog/134601
http://superuser.com/questions/803741/how-to-enable-ip-masquerading-forwarding-on-centos-7
2015/12/02
2015/10/20
2014/11/28
找到以下資料
很方便
但看來有點危險
使用下列指令
sudo vi /etc/sudoers
或
sudo visudo
就是去編輯設定檔。
將這行
%sudo ALL=(ALL:ALL) ALL
改成
%sudo ALL=(ALL:ALL) NOPASSWD:ALL
https://www.mxp.tw/2014/06/25/ubuntu-sudo-nopasswd-%E4%B8%8D%E7%94%A8%E8%BC%B8%E5%85%A5%E5%AF%86%E7%A2%BC%E8%A8%AD%E5%AE%9A/