目前 /etc/fstab都改用UUID來替代之前 /dev/sdx的方式了
如何查uuid呢
在/dev/disk下有几個目錄可以看得到
http://blog.lefthander.tw/2010/03/ubuntu-uuid.html
2013/06/27

2013/06/24
因為有可能要做主机的升級
有資料必需要移到新机器上
之前使用clonezilla時有提供利用ssh mout遠端目錄的功能
使用的是sshfs
在centos 5.6 以上只要yum install sshfs -y
接下來
usage: sshfs [user@]host:[dir] mountpoint [options]
http://talk.away.com.tw/main/modules/weblog/details.php?blog_id=167
有資料必需要移到新机器上
之前使用clonezilla時有提供利用ssh mout遠端目錄的功能
使用的是sshfs
在centos 5.6 以上只要yum install sshfs -y
接下來
usage: sshfs [user@]host:[dir] mountpoint [options]
http://talk.away.com.tw/main/modules/weblog/details.php?blog_id=167
2013/06/20
昨天把win的log丟到log server後分析程式出現問題
就是看不到本文
所有的log變成了附件
要看的話就很麻煩
改用mutt來寄
語法跟mail其實差不多
mutt [-a 附加檔] [-i 內文檔] [-b 秘密副本] [-c 一般副本] [-s 信件標題] email位址 < mail內容
http://linux.vbird.org/linux_server/0380mail.php#mua_mutt
中文就ok了
就是看不到本文
所有的log變成了附件
要看的話就很麻煩
改用mutt來寄
語法跟mail其實差不多
mutt [-a 附加檔] [-i 內文檔] [-b 秘密副本] [-c 一般副本] [-s 信件標題] email位址 < mail內容
http://linux.vbird.org/linux_server/0380mail.php#mua_mutt
中文就ok了
2013/06/19
早上發生一台win 2012 server 出現自動重開的情況
而重開發顯示捉不到HD
mirror box的lcd則出現rebuild的訊息
把有問題的hd先拔出後
再重開
chkdsk
service壞了好几個
看了一下log
發現昨天早上就出現hd有問題
找了一下
找到
https://code.google.com/p/eventlog-to-syslog/
http://ssorc.tw/?p=1197
這個可以把win的log丟到syslog
將 evtsys.dll 及 evtsys.exe 放至 %systemroot%system32
%systemroot%system32evtsys -i -h 1.1.1.1
net start evtsys
若要uninstall
net stop evtsys
%systemroot%system32evtsys -u
在log server上就會有記錄了
但出現的是主机名稱而不是ip
coding撈資料的時候要注意一下
而重開發顯示捉不到HD
mirror box的lcd則出現rebuild的訊息
把有問題的hd先拔出後
再重開
chkdsk
service壞了好几個
看了一下log
發現昨天早上就出現hd有問題
找了一下
找到
https://code.google.com/p/eventlog-to-syslog/
http://ssorc.tw/?p=1197
這個可以把win的log丟到syslog
將 evtsys.dll 及 evtsys.exe 放至 %systemroot%system32
%systemroot%system32evtsys -i -h 1.1.1.1
net start evtsys
若要uninstall
net stop evtsys
%systemroot%system32evtsys -u
在log server上就會有記錄了
但出現的是主机名稱而不是ip
coding撈資料的時候要注意一下
2013/06/04
前不久安裝了smokeping
補一下監控的部分
先裝上mail client
apt-get install mailutils
#vi /etc/smokeping/config.d/Alerts
*** Alerts ***
to = derek@faq-book.com #設定要收到警報信件的信箱
from = faq@faq-book.com #設定本機發信的帳號
+someloss
type = loss
# in percent
pattern = >0%,*12*,>0%,*12*,>0%
comment = loss 3 times in a row
以下為範例
+lossdetect
type = loss
# in percent
pattern = ==0%,==0%,==0%,==0%,>20%,>20%,>20%
comment =
#說明 : 這是用來偵測突然間loss封包
+miniloss
type = loss
# in percent
pattern = >0%,*4*,>0%,*4*,>0%
comment =
#說明 : 當連續兩個週期封包都有loss 4個或高於0%,且在第三個週期封包高於0 %的話就alert
+someloss
type = loss
# in percent
pattern = >20%,>20%
comment =
#說明 : 當連續兩個週期封包都Loss高於20% 時就alert
+rttdetect
type = rtt
# in milliseconds
pattern = <10,<10,<10,<10,<10,<100,>100,>100,>100
comment =
#說明: 如果當前5次延遲小於10 ms,第6次小於100 ms而從第7次開始連續三次都高於100 ms的話就alert
+rttbadstart
type = rtt
# in milliseconds
pattern = >4.5,>4.5
comment =
#說明 : 在連續兩個週期內ping值平均都高於4.5 ms時就alert
接下來要在/etc/smokeping/config.d/Targets裡
每一個要監控的device最後加上
alerts = lossdetect,miniloss <------ 加入所需要的監控條件
service smokeping restart
http://ithelp.ithome.com.tw/question/10076486
補一下監控的部分
先裝上mail client
apt-get install mailutils
#vi /etc/smokeping/config.d/Alerts
*** Alerts ***
to = derek@faq-book.com #設定要收到警報信件的信箱
from = faq@faq-book.com #設定本機發信的帳號
+someloss
type = loss
# in percent
pattern = >0%,*12*,>0%,*12*,>0%
comment = loss 3 times in a row
以下為範例
+lossdetect
type = loss
# in percent
pattern = ==0%,==0%,==0%,==0%,>20%,>20%,>20%
comment =
#說明 : 這是用來偵測突然間loss封包
+miniloss
type = loss
# in percent
pattern = >0%,*4*,>0%,*4*,>0%
comment =
#說明 : 當連續兩個週期封包都有loss 4個或高於0%,且在第三個週期封包高於0 %的話就alert
+someloss
type = loss
# in percent
pattern = >20%,>20%
comment =
#說明 : 當連續兩個週期封包都Loss高於20% 時就alert
+rttdetect
type = rtt
# in milliseconds
pattern = <10,<10,<10,<10,<10,<100,>100,>100,>100
comment =
#說明: 如果當前5次延遲小於10 ms,第6次小於100 ms而從第7次開始連續三次都高於100 ms的話就alert
+rttbadstart
type = rtt
# in milliseconds
pattern = >4.5,>4.5
comment =
#說明 : 在連續兩個週期內ping值平均都高於4.5 ms時就alert
接下來要在/etc/smokeping/config.d/Targets裡
每一個要監控的device最後加上
alerts = lossdetect,miniloss <------ 加入所需要的監控條件
service smokeping restart
http://ithelp.ithome.com.tw/question/10076486
2013/06/03
mail server一直以來發生一個問題
就是user quota爆掉後
在log就會出現
r52CXO8W032653 9968 Sun Jun 2 20:33 <notification+zrdo6rzil6le@pages.facebo
(Deferred: local mailer (/usr/bin/procmail) exited with EX_TE)
<abc@abc.com>
看起來是因為quota 爆了之後信就會卡在queue裡而不會退信
參考了一下這個
http://phorum.vbird.org/viewtopic.php?f=2&t=15986&start=0
發現解決的方法是拉大quota 的soft和hard 並把grace調為1天
這樣user就會收到quota的告警信 而且在queue裡信超過一天就會被退掉
不會塞在queue中
設定grace的指令如下
edquota -f /dev/sda1 -t
另外之前有提到當user的quota滿了之後信會寫到 /var/spool/mail
所以也順便在 /home開了一個mailq的目錄
再 ln -s /var/spool/mail /home/mailq
這樣quota就全算在一起了
就是user quota爆掉後
在log就會出現
r52CXO8W032653 9968 Sun Jun 2 20:33 <notification+zrdo6rzil6le@pages.facebo
(Deferred: local mailer (/usr/bin/procmail) exited with EX_TE)
<abc@abc.com>
看起來是因為quota 爆了之後信就會卡在queue裡而不會退信
參考了一下這個
http://phorum.vbird.org/viewtopic.php?f=2&t=15986&start=0
發現解決的方法是拉大quota 的soft和hard 並把grace調為1天
這樣user就會收到quota的告警信 而且在queue裡信超過一天就會被退掉
不會塞在queue中
設定grace的指令如下
edquota -f /dev/sda1 -t
另外之前有提到當user的quota滿了之後信會寫到 /var/spool/mail
所以也順便在 /home開了一個mailq的目錄
再 ln -s /var/spool/mail /home/mailq
這樣quota就全算在一起了
2013/05/31
aruba campus ap改成remote ap的步驟

在configuration > security > authentication > internal DB
加入username password
role選擇authenticated

configuration > Advanced Services > VPN Services
加上address pool
及IKE Shared Secrets
再來
configuration > wireless > ap installation
選要改為remote ap的ap按下 provision

選擇 remote ap
打入 之前的IKE PSK
取消 Use Automatic Generation
打入 username password
重新修改ap的ip相關資料
PS 無法直接從ap的console改成remote ap 一定要先定義成campus ap再由controller改為 remote ap
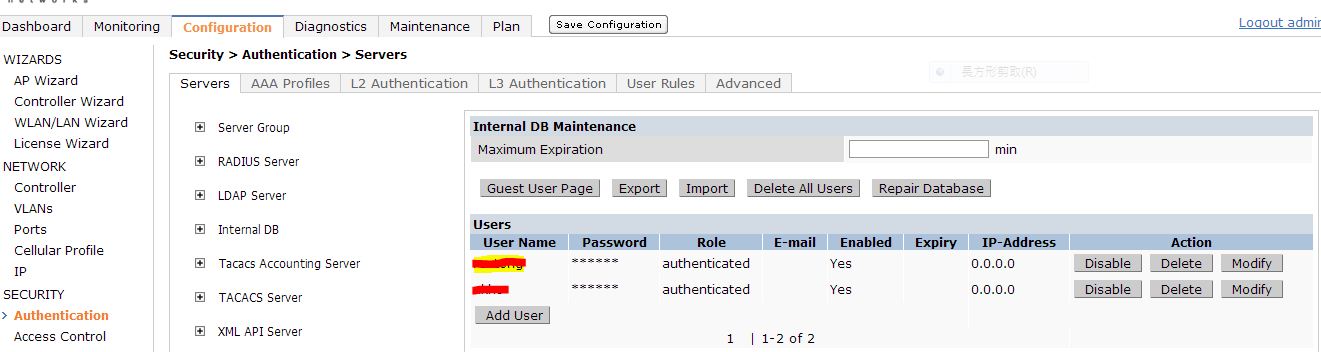
在configuration > security > authentication > internal DB
加入username password
role選擇authenticated

configuration > Advanced Services > VPN Services
加上address pool
及IKE Shared Secrets
再來
configuration > wireless > ap installation
選要改為remote ap的ap按下 provision

選擇 remote ap
打入 之前的IKE PSK
取消 Use Automatic Generation
打入 username password
重新修改ap的ip相關資料
PS 無法直接從ap的console改成remote ap 一定要先定義成campus ap再由controller改為 remote ap
2013/05/30
2013/05/28
以下是如何在fortiget開啟debug並經由GUI的設定過程得到script的步驟
把script存檔
之後就可以經由修改存下來的檔案
使用ssh經由forti clinet來下指令了
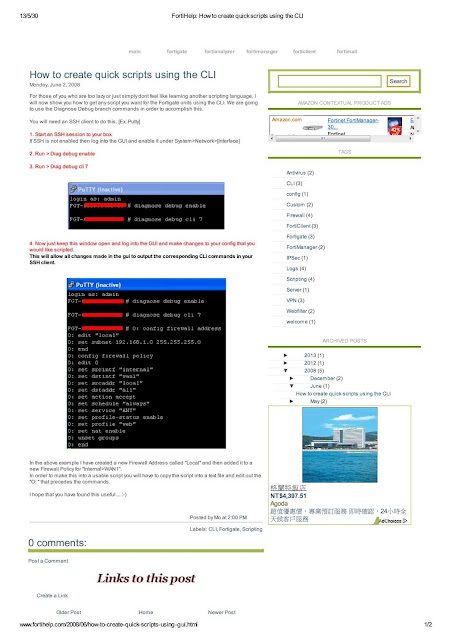
http://www.fortihelp.com/2008/06/how-to-create-quick-scripts-using-gui.html
把script存檔
之後就可以經由修改存下來的檔案
使用ssh經由forti clinet來下指令了

http://www.fortihelp.com/2008/06/how-to-create-quick-scripts-using-gui.html
FWS 624升級firmware後client拿不到ip 的問題終於有了解答
目前使用的 FGS04302c.bin這個版本在打開dhcp snooping的時候
並不會在dhcp的封包加上option 82的訊息
但之後的版本會
如下圖所示
 而封包向上流會經過cisco 3750
問題就來了 cisco預設會丟棄含有option 82的封包
但有指令可以讓cisco不做check
目前使用的 FGS04302c.bin這個版本在打開dhcp snooping的時候
並不會在dhcp的封包加上option 82的訊息
但之後的版本會
如下圖所示

問題就來了 cisco預設會丟棄含有option 82的封包
但有指令可以讓cisco不做check
ip dhcp relay information trust-all (全域)
或
ip dhcp relay information trusted (每埠或vlan)
但目前在cisco 3750上又開啟了dhcp snooping
導致以上二個指令在這種情況是無法作用的
接下來就只剩一個解法了
在brocade的每一個port加上
no dhcp snooping relay information
讓brocade不要在封包加上option 82
問題是這個指令無法使用 int e 0/1/1 to 0/1/24 來下
要一個port 一個port下
有一千多個port 喔
想到就累 @@
2013/05/26
升到proxmox 3.0後
發生一個很嚴重的問題
所有的nfs竟然都mount不上
在server上出現以下的log
May 26 06:56:00 proxmox30 pvestatd[5548]: WARNING: mount error: mount.nfs: an incorrect mount option was specified
初步看來是mount nfs是有一個option有問題
可是在proxmox的管理介面上並沒有地方可以設定mount nfs的option
應該要進os手動去改了
再仔細查了一下
因為proxmox 3.0的os已經升成debian 7.0了
而原來的要mout nfs所使用的portmap已經換成rpcbind 導致必須設定某些參數才能使用
進os手動去下mount nfs時出現
mount.nfs: rpc.statd is not running but is required for remote locking.
mount.nfs: Either use '-o nolock' to keep locks local, or start statd.
mount.nfs: an incorrect mount option was specified
而原來所使用的/etc/pve/storage.cfg並沒有設定nolock這個option
而如上所述在proxmox的管理介面上也沒有地方可以加option
只好手動來了
在/etc/pve/storage.cfg上所有有關nfs的storage上手動加上 options nolock
範例如下
nfs: nfs104_iso
path /mnt/pve/nfs104_iso
server 1.1.1.104
export /mnt/vm_data/ISO
options nolock
content iso
reboot或是
/etc/init.d/rpcbind restart
/etc/init.d/nfs-common restart
就可以了
發生一個很嚴重的問題
所有的nfs竟然都mount不上
在server上出現以下的log
May 26 06:56:00 proxmox30 pvestatd[5548]: WARNING: mount error: mount.nfs: an incorrect mount option was specified
初步看來是mount nfs是有一個option有問題
可是在proxmox的管理介面上並沒有地方可以設定mount nfs的option
應該要進os手動去改了
再仔細查了一下
因為proxmox 3.0的os已經升成debian 7.0了
而原來的要mout nfs所使用的portmap已經換成rpcbind 導致必須設定某些參數才能使用
進os手動去下mount nfs時出現
mount.nfs: rpc.statd is not running but is required for remote locking.
mount.nfs: Either use '-o nolock' to keep locks local, or start statd.
mount.nfs: an incorrect mount option was specified
而原來所使用的/etc/pve/storage.cfg並沒有設定nolock這個option
而如上所述在proxmox的管理介面上也沒有地方可以加option
只好手動來了
在/etc/pve/storage.cfg上所有有關nfs的storage上手動加上 options nolock
範例如下
nfs: nfs104_iso
path /mnt/pve/nfs104_iso
server 1.1.1.104
export /mnt/vm_data/ISO
options nolock
content iso
reboot或是
/etc/init.d/rpcbind restart
/etc/init.d/nfs-common restart
就可以了
2013/05/23
為了監控RTT的狀況
安裝smokeping來用
之前有裝過
但移机時沒有移到 不知道到那裡去了
考慮到安裝方便性
直接使用ubuntu 12.04
os裝好後
apt-get install smokeping就ok了
但有二個問題
第一是smokeping預設要使用sendmail來發信
如果沒有裝 會有錯誤訊息
但相依性並沒有檢查到
所以要再手動
apt-get install sendmail
第二是
rrd檔的預設路徑在 /var/lib/smokeping
可是安裝時並未建立Local這個資料夾
所以要再手動建立並把owner改為smokeping.smokeping
或直接chmod -R 777
config路徑為
/etc/smokeping/config.d
主要修改Targets這個檔案就可以了
改完後一定要 service smokeping restart
安裝smokeping來用
之前有裝過
但移机時沒有移到 不知道到那裡去了
考慮到安裝方便性
直接使用ubuntu 12.04
os裝好後
apt-get install smokeping就ok了
但有二個問題
第一是smokeping預設要使用sendmail來發信
如果沒有裝 會有錯誤訊息
但相依性並沒有檢查到
所以要再手動
apt-get install sendmail
第二是
rrd檔的預設路徑在 /var/lib/smokeping
可是安裝時並未建立Local這個資料夾
所以要再手動建立並把owner改為smokeping.smokeping
或直接chmod -R 777
config路徑為
/etc/smokeping/config.d
主要修改Targets這個檔案就可以了
改完後一定要 service smokeping restart
2013/05/18

之前開始使用snort來detect port scan之後
所有ip都有記錄起來
今天想到是不是可以把這些ip直接畫在地圖上
這樣出來的圖應該很美 :D
於是找到了這個網站
http://freegeoip.net/
只要把ip貼上
就可以拿到有關這個ip的相關地圖資料(包含經緯度)
使用 wget 指令
http://freegeoip.net/{format}/{ip_or_hostname}
Supported formats are csv, xml or json.
wget http://freegeoip.net/csv/$i -O ip_tmp
cat ip_tmp |cut -d "," -f 8,9 >> map
單獨取出經緯度
這樣就可以畫在地圖上了
接下來到這個網站
http://gissrv4.sinica.edu.tw/gis/tools/geocoding.aspx
把上面產生出來的map資料貼上去

大功告成
再來就是思考要怎麼自動化了
所有ip都有記錄起來
今天想到是不是可以把這些ip直接畫在地圖上
這樣出來的圖應該很美 :D
於是找到了這個網站
http://freegeoip.net/
只要把ip貼上
就可以拿到有關這個ip的相關地圖資料(包含經緯度)
使用 wget 指令
http://freegeoip.net/{format}/{ip_or_hostname}
Supported formats are csv, xml or json.
wget http://freegeoip.net/csv/$i -O ip_tmp
cat ip_tmp |cut -d "," -f 8,9 >> map
單獨取出經緯度
這樣就可以畫在地圖上了
接下來到這個網站
http://gissrv4.sinica.edu.tw/gis/tools/geocoding.aspx
把上面產生出來的map資料貼上去

大功告成
再來就是思考要怎麼自動化了
snmp oid
counter32 和counter64的區別
counter32 其能表示最大值为2^32Byte=4GB
counter64 最大值为16EB
值的概念是如果giga滿載 counter64要4000多年才能達到
但是如果是counter32的呢 giga滿載只要32秒即可達到此值 而到達後值就會reset
因此就會造成cacti出現一支一支白白的情況
建議是流量超過100MB的話一定要使用counter64
snmp v2才支援counter64
當然重點是設備要有支援
http://gaogo.blog.51cto.com/801285/1172834
counter32 和counter64的區別
counter32 其能表示最大值为2^32Byte=4GB
counter64 最大值为16EB
值的概念是如果giga滿載 counter64要4000多年才能達到
但是如果是counter32的呢 giga滿載只要32秒即可達到此值 而到達後值就會reset
因此就會造成cacti出現一支一支白白的情況
建議是流量超過100MB的話一定要使用counter64
snmp v2才支援counter64
當然重點是設備要有支援
http://gaogo.blog.51cto.com/801285/1172834
2013/05/14
有關rspan的config方法如下
前提是二台switch要用trunk連結
不能使用routing模式
使用RSPAN監聽switch A連接server端的實例:
switch A配置如下:
!
vlan 925
remote-span
monitor session 1 source interface FastEthernet1/1 both
monitor session 1 destination remote vlan 925
!
switch B配置如下:
!
vlan 925
remote-span
monitor session 1 source remote vlan 925
monitor session 1 destination interface Fastethernet 2/2
若在switch B上需要再加上一個port來monitor
則再加上
monitor session 2 source interface Gi1/1
monitor session 2 destination remote vlan 925
把 gi1/1的流量也丟到vlan 925
再把vlan 925 導出來
亦即 vlan 925視為一個pool
跨不同的switch 但所有的switch 都必須設定vlan 925且定義為remote-span
可以把所有要monitor的流量丟進去
最後再導出來
http://tc.wangchao.net.cn/bbs/detail_1628933.html
rspan無法在routing架構下使用
必須使用erspan來達成
前提是二台switch要用trunk連結
不能使用routing模式
使用RSPAN監聽switch A連接server端的實例:
switch A配置如下:
!
vlan 925
remote-span
monitor session 1 source interface FastEthernet1/1 both
monitor session 1 destination remote vlan 925
!
switch B配置如下:
!
vlan 925
remote-span
monitor session 1 source remote vlan 925
monitor session 1 destination interface Fastethernet 2/2
若在switch B上需要再加上一個port來monitor
則再加上
monitor session 2 source interface Gi1/1
monitor session 2 destination remote vlan 925
把 gi1/1的流量也丟到vlan 925
再把vlan 925 導出來
亦即 vlan 925視為一個pool
跨不同的switch 但所有的switch 都必須設定vlan 925且定義為remote-span
可以把所有要monitor的流量丟進去
最後再導出來
http://tc.wangchao.net.cn/bbs/detail_1628933.html
rspan無法在routing架構下使用
必須使用erspan來達成
2013/05/13
2013/05/12
開始使用http://www.network-weathermap.com/
來畫出即時的流量圖
因為不想跟cacti整合
所以用stand alone來跑
以下的安裝教學還滿詳細的
http://www.cactifans.org/index.php/2011/04/cacti%E6%8F%92%E4%BB%B6%E8%AF%A6%E8%A7%A3-weathermap/
如果本來已經有裝好cacti 則要再加裝php5-gd 及php-pear
也建議先裝好cacti再來裝weathermap 因為直接使用cacti所產生的rrd資料檔來畫圖會方便許多
在執行http://xxx.xxx.xxx.xxx/weathermap/editor.php時
link的部分設定要注意的地方如下

Bandwidth要依照現實環境修改
Data Source的地方請至cacti找出要使用的port的rrd file再填入絶對路徑
此外建立link時第一個點選的node就是要使用該port資料的node
建立後在config內的資料如下
LINK node1-node2
TARGET /var/www/html/cacti-0.8.8a/rra/1.1.1.1_traffic_in_467.rrd
NODES 3750 7609
BANDWIDTH 1G
請注意 TARGET /var/www/html/cacti-0.8.8a/rra/1.1.1.1_traffic_in_467.rrd
就是 3750 上要使用的port的資料(跟7609的link port)
如果發現資料流方向相反 請手動修正 NODES的順序
接下來如果依照上述文件來跑crontab
*/5 * * * * root /usr/bin/php /var/www/html/weathermap/weathermap --config /var/www/html/weathermap/configs/simple.conf --image-uri ../weathermap/test.png
我的操作結果是圖完全無法產生
但手動下指令是ok的
感覺上好像跟要使用lib的路徑有關
目前的解決方式是先寫一個shell如下
#!/bin/bash
cd /var/www/weathermap
/usr/bin/php weathermap --config configs/simple.conf --output weathermap.png --htmloutput index.html
再用crontab跑這個shell
config有很多地方可以細調
詳細的config資料如下
http://www.network-weathermap.com/manual/latest/pages/config-reference.html#GLOBAL_FONTDEFINE
若要更換不同的ICON
要放到images這個資料夾並使用PNG檔
大小無所謂
因為config裡可以設定
以下的教學檔也不錯
http://blog.163.com/fan_yishan/blog/static/476922132010994424449/
修改圖例相對應的參數如下圖所示

來畫出即時的流量圖
因為不想跟cacti整合
所以用stand alone來跑
以下的安裝教學還滿詳細的
http://www.cactifans.org/index.php/2011/04/cacti%E6%8F%92%E4%BB%B6%E8%AF%A6%E8%A7%A3-weathermap/
如果本來已經有裝好cacti 則要再加裝php5-gd 及php-pear
也建議先裝好cacti再來裝weathermap 因為直接使用cacti所產生的rrd資料檔來畫圖會方便許多
在執行http://xxx.xxx.xxx.xxx/weathermap/editor.php時
link的部分設定要注意的地方如下

Bandwidth要依照現實環境修改
Data Source的地方請至cacti找出要使用的port的rrd file再填入絶對路徑
此外建立link時第一個點選的node就是要使用該port資料的node
建立後在config內的資料如下
LINK node1-node2
TARGET /var/www/html/cacti-0.8.8a/rra/1.1.1.1_traffic_in_467.rrd
NODES 3750 7609
BANDWIDTH 1G
請注意 TARGET /var/www/html/cacti-0.8.8a/rra/1.1.1.1_traffic_in_467.rrd
就是 3750 上要使用的port的資料(跟7609的link port)
如果發現資料流方向相反 請手動修正 NODES的順序
接下來如果依照上述文件來跑crontab
*/5 * * * * root /usr/bin/php /var/www/html/weathermap/weathermap --config /var/www/html/weathermap/configs/simple.conf --image-uri ../weathermap/test.png
我的操作結果是圖完全無法產生
但手動下指令是ok的
感覺上好像跟要使用lib的路徑有關
目前的解決方式是先寫一個shell如下
#!/bin/bash
cd /var/www/weathermap
/usr/bin/php weathermap --config configs/simple.conf --output weathermap.png --htmloutput index.html
再用crontab跑這個shell
config有很多地方可以細調
詳細的config資料如下
http://www.network-weathermap.com/manual/latest/pages/config-reference.html#GLOBAL_FONTDEFINE
若要更換不同的ICON
要放到images這個資料夾並使用PNG檔
大小無所謂
因為config裡可以設定
以下的教學檔也不錯
http://blog.163.com/fan_yishan/blog/static/476922132010994424449/
修改圖例相對應的參數如下圖所示

訂閱:
文章 (Atom)