2013/08/26

最近一直在try ubuntu上的kvm相關功能
在ubuntu上裝了virt-viewer卻一直連不上遠端的kvm
一直出現URI錯誤
試了半天發現到ssh 的另一個功能
ssh -Y abc@1.1.1.1 登入後
接下來執行的指令就都會forword到本地端來了
所以直接使用virt-manager就可以囉
早上有人反應webmail打不開
查了一下log
發現如下的情況

Aug 26 09:44:09 mail dovecot: master: Warning: service(imap): process_limit reached, client connections are being dropped
Aug 26 09:45:20 mail dovecot: master: Warning: service(imap): process_limit reached, client connections are being dropped
Aug 26 09:46:25 mail dovecot: master: Warning: service(imap): process_limit reached, client connections are being dropped
Aug 26 09:49:32 mail dovecot: master: Warning: service(imap): process_limit reached, client connections are being dropped

imap 超過預設值了

修改/etc/dovecot/conf.d/10-master.conf
#default_process_limit = 100
default_process_limit = 2000
#default_client_limit = 1000
default_client_limit = 4003

service auth {
加上
client_limit=6048
}

dovecot restart後再觀察看看
dovecot restart時如果預設值有問題
會顯示應該調整的參數

升到centos 6 後不管是postfix或是dovecot 預設值都滿低的
只能夠碰到問題再來慢慢調整了


在ubuntu 12.04上kvm要使用spice要執行的動作如下

1. apt-get install qemu-kvm-spice

2. 到/usr/bin/ 下把kvm ln 到qemu-system-x86_64-spice

    ln -s qemu-system-x86_64-spice kvm

原kvm是link到 qemu-system-x86_64

如果不改link的話 guest是無法boot的

再來就是在guest os裡安裝guest tool
在virt-manager裡修改 顯示vnc為spice
視訊改為qxl

在來就是virt-manager也無法直接使用guest console

必須 spicec -h localhost -p 5900 來連接 guest os

還有一個問題就是原來沒使用spice的机器在boot之後 在virt-manager的console也沒有畫面了
把kvm的link再改回來才正常
不知道是不是沒法共存


2013/08/25

之前介紹proxmox的spice提到聲音的部分
今天查了一下官方網站
發現聲音及usb都ok吔,但usb目前windows還不支援
只要在 /etc/pve/qemu-server/id.conf
手動加上

usb0: spice
args: -device AC97,addr=0x18

就ok了
但目前網頁介面還沒辦法操作就是了
一定要使用文字介面
感覺上有很多地方在網頁處理應該都沒什麼困難
但proxmox總是不會那麼快加上去
對不熟linux的人感覺上就是沒那麼順手

2013/08/24

調整 kvm guest i/o 效能

Storage format: raw
Cache mode: none (not default!)
I/O mode: native

儘量使用SATA而不是 IDE

2013/08/23

因為proxmox升到3.1後開始把repo分成有無訂購二個部分
而且每次登入都會跳出無license key的訊息
所以再找看看是否有其他的解決方案
於是在ubuntu上裝KVM來試看看
參考以下的文件
https://help.ubuntu.com/community/KVM
安裝還滿方便的
順便把virt-manager裝起來
就有GUI可以管理了
而network比較麻煩一點
預設安裝是起一個virbr0使用dhcp
但習慣上會直接bridge到host中一個網卡
所以要手動在/etc/network/interface上加一個br0
範例如下

auto eth0
iface eth0 inet manual

auto br0
iface br0 inet static
        address 1.1.0.1
        network 1.1.0.0
        netmask 255.255.255.0
        broadcast 1.1.0.255
        gateway 1.1.0.254
        bridge_ports eth0
        bridge_stp off
        bridge_fd 0
        bridge_maxwait 0

在create新的guest就可以手動使用br0這個網卡

再來碰到一個問題就是在x64的host上安裝了x32的win7 再指定cpu為x32
此時在guest中關机一定會reboot而無法關機
所以一定要把cpu指定為x64 而不管guest是x32或x64 才不會有這個問題

看起來proxmox的整合還是方便很多
而且要叫user再學也是成本
應該會考慮買support

2013/08/15

轉換到新mail server時發生用webmail走imap登入時無法出現資料夾的情況
查了一下log發現新版本的dovecot 有限制user+IP的連線數量
預設為10
log如下
Aug 11 20:49:07 mail dovecot: imap-login: Maximum number of connections from user+IP exceeded (mail_max_userip_connections=10): user=<test>, method=PLAIN, rip=1.1.1.1, lip=2.2.2.2
查了一下文件
先在/etc/dovecot/dovecot.conf加上
mail_max_userip_connections = 200

後正常
再觀察看看

2013/08/12

如何使用telnet 跟imap溝通

telnet localhost 143
登入 (01 要連同輸入)

01 login cross@ssorc.tw 123456
列出有那些信件夾

02 list "" "*"
信件夾狀態

03 status [MAILBOX] [MESSAGES|RECENT|UNSEEN]
進入 INBOX 這信件夾

04 select INBOX
列出 INBOX 裡的信件

05 fetch 1:* flags
列出信件表示為1 的信件表頭(header)

06 fetch 1 body[header]
列出信件表示為1 的信件內容(body)

07 fetch 1 body[text]
如果要看其它封,一定要先

08 fetch 2:* flags
刪除信件

09 store 1 flags \Deleted

http://itindex.net/detail/43564-telnet-%E6%8C%87%E4%BB%A4-imap

2013/08/10

在rsync大量資料時
如几百G或上T
常常會有中斷的情況
此時就需要使用續傳
指令如下

rsync -avzP   /src          /dst
                  原目錄  目的目錄

http://my.huhoo.net/archives/2008/12/rsync.html

2013/08/07

決定使用(也沒有選擇)xfs後才知道xfs的quota跟ext是不同的

首先是/etc/fstab要加上 uquota 這也跟ext的不同

接下來是設定的指令

xfs_quota -x -c "limit -g bsoft=10000m bhard=10100m sample_quota" /dev/sdb1

以下是show 出所有人quota的指令
xfs_quota -x -c report /dev/sdb1

再來這個就相同了
把user2的quota設成跟user1相同
edquota  -p user1  user2

2013/08/06

今天開始mail server的移轉前置工作
首先就遇到了storage過大的問題
因為這次買的机器肚子全部插滿
所以容量有27TB
因此原本經常使用的fisk已經沒法處理這麼大的容量
必須使用parted
指令如下

# parted /dev/sdb 

parted>mklabel GPT 

parted>print //查看空间

parted>mkpart primary 0 xxxx //创建主分区,xxxx是上一步得来的数据.(mkpart extended创建扩展分区)

parted>print //查看分区情况

parted>quit //退出

# partprobe

# mkfs.ext3 /dev/sdb1 //对分区进行格式化,创建文件系统

此处情况下,在mkfs.ext3 /dev/sdb1 还会出现一个错误,错误信息如下所示:

# mkfs.ext3 /dev/sdb1

mke2fs 1.39 (29-May-2006)

mkfs.ext3: Size of device /dev/sdc1 too big to be expressed in 32 bits using a blocksize of 4096.

来看看ext3文件系统对单个文件和整个文件系统的最大尺寸的限制情况,这些情况依赖文件系统的块大小。如下所示:

块大小     最大文件     最大文件系统

1kb          16G             2T

2KB          256G           8T

4KB           2T               16T

8KB           16T             32T

因此上面格式化时就会报错。系统默认快大小是4kb,而磁盘是21.7T,已经超过了最大系统文件大小了。因此需要修改块大小。或划分为多个分区(不得超过16T)。

# mkfs.ext4 -b 8192 /dev/sdb1

http://www.ttlsa.com/html/920.html

後記

若依上述方法可以mkfs但無法mout
因為目前ext4在centos6中最大的支援大小為16T而且block為4k
參考
http://tetralet.luna.com.tw/index.php?op=ViewArticle&articleId=214&blogId=1
決定使用btrfs
下完mkfs.btrfs按下enter馬上就ok
原本以為有問題
再下一次
還是馬上ok
mount看看
可以用吔
看來btrfs真不是蓋的

使用btrfs還是有問題
再改成xfs

20240304 新增

由於在使用parted 分割在mkpart時輸入End的計算一直有問題
所以如果要使用全部的空間
建議直接打 100% 就可以了
過程如下

(parted) mkpart /dev/sda
File system type?  [ext2]? xfs                                            
Start? 1                                                                  
End? 100%                                                                 
(parted) print                                                            
Model: SYNOLOGY Storage (scsi)
Disk /dev/sda: 32.2TB
Sector size (logical/physical): 512B/512B
Partition Table: gpt
Disk Flags: 

Number  Start   End     Size    File system  Name      Flags
 1      1049kB  32.2TB  32.2TB  xfs          /dev/sda

最近二個月在新机器上出現了二次i/o的問題
今天打電話去原廠
本來是要問有沒有新的mirror box的產品
順便問了一下i/o的問題
原廠才提到使用在nas或mirror box上的硬碟必須有
TLER(time-limited error recovery)的功能
而目前市面上非企業級硬碟為了cost down
都把這個功能拿掉了
導致机器運作的過程中就會有問題
所以之後在買硬碟前
必須打電話回原廠
詢問有那些硬碟有這個功能
才能買囉
所以pc隨机出貨的硬碟大概也都不能用了
XD

2013/07/31

proxmox前不久把SPICE加入了pvetest的部分
主要的目的是利用SPICE讓client的顯示更順
放大縮小畫面的時候也會跟著調整
mouse wheel也可以使用了
目前使用1080p來看youtube的影片還滿順的
再來就只差聲音的部分了

說明一下設定的步驟

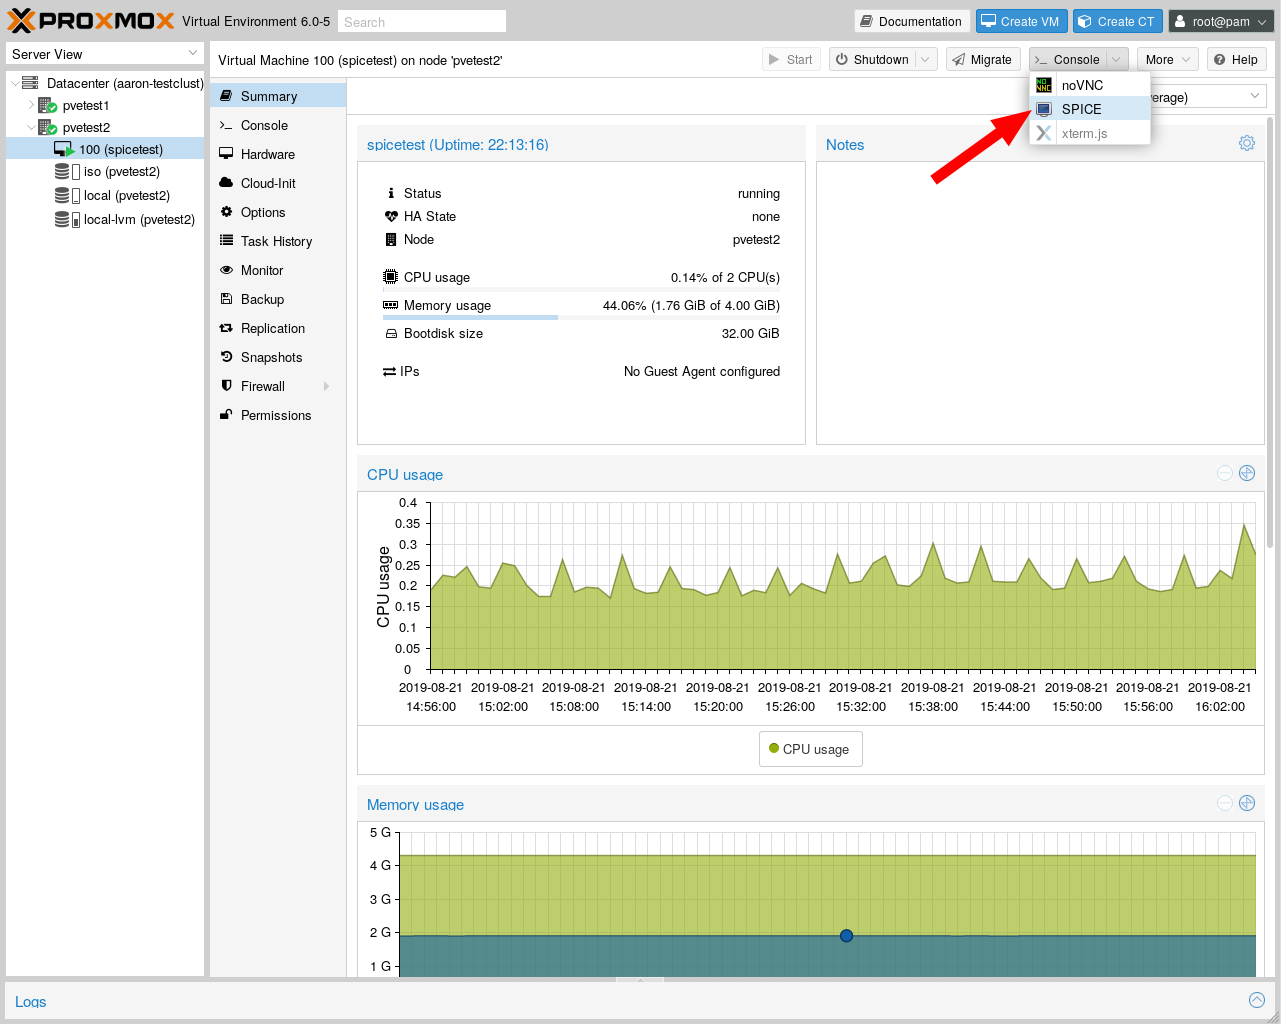
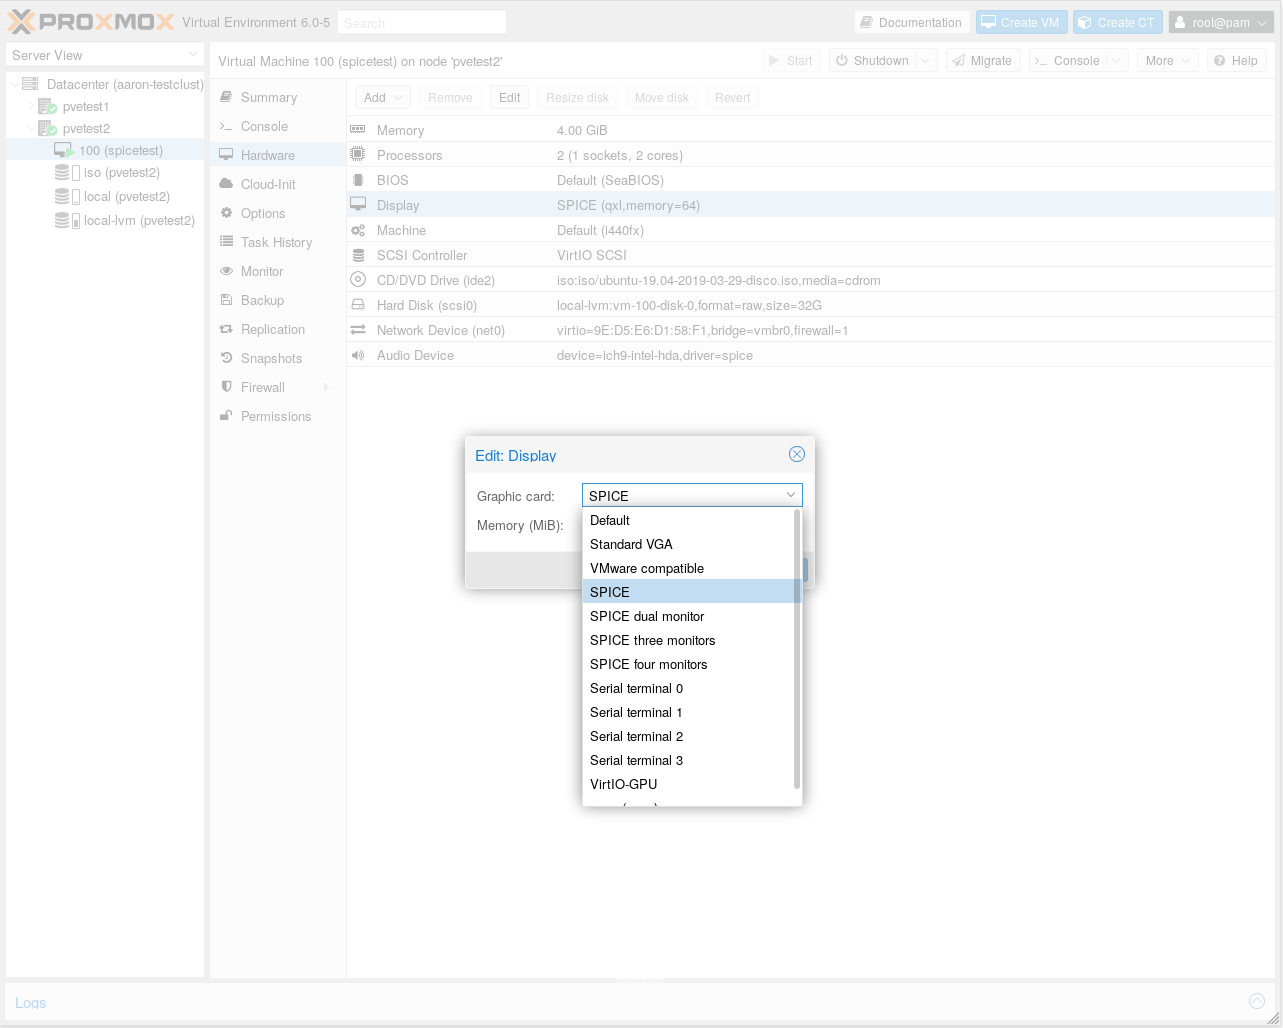
1. 把guest os的顯卡改為SPICE


2. 再來在guest os裡安裝 SPICE guest tool

3. 在要管理guest os的机器上安裝 virt-viewer
    http://virt-manager.org/download/sources/virt-viewer/virt-viewer-x86-0.5.6.msi
    http://virt-manager.org/download/sources/virt-viewer/virt-viewer-x64-0.5.6.msi

以上軟体在
http://spice-space.org/download.html


4. 啟動guest os後點選Spice


在chrome上會下載一個.vv的檔案
直接執行即可
系統會以virt-viewer打開
firefox則會直接以virt-viewer打開

2013/07/24

Ruckus 需用之mib

ruckusZDWLANAPNumSta 1.3.6.1.4.1.25053.1.2.2.1.1.2.1.1.15 Total number of
authenticated
terminal which is
using currently
on this AP.

ruckusZDWLANAPIPAddr 1.3.6.1.4.1.25053.1.2.2.1.1.2.1.1.10 IP address.


Number of total Clients
1.3.6.1.4.1.25053.1.2.2.1.1.1.1.1.12

2013/07/22

在config cisco port description的過程中發現只要打到某些中文字就會出現異常

進config mode後加入以下二行指令就正常了

default-value exec-character-bits 8
default-value special-character-bits

2013/07/18

有一段時間沒使用openvas
今天要使用時發現已經升到openvas 6了
但要登入時一直出現

OMP service was down

先執行
openvas-setup

還是不行
只好到原始網站下載工具來check
http://www.openvas.org/setup-and-start.html

一面跑一面補
看到有error的地方就照指示執行一下指令
跑完後reboot
目前看來ok

2013/07/07

mollify

最近有個需求就是要讓user能上傳檔案
而且最好是能自行註冊 註冊完後順便開好目錄
而目錄只供自己使用 別人無法進入
找到了mollify
必須使用到mysql
但安裝好後user self registration的plugin並未啟動
必須在configuration.php裡加上一些參數

問題在於第一個使用者註冊後的user folder會被設定為public
接下來註冊的user登入後就會有二個目錄
目前的解決方法是把第一個使用者目錄的權限設為所有人read only而且不放資料
讓接下來的使用者只能把資料放在自己的目錄內

2013/07/03

brocade mac snmp

暑假要把大部分的L2 換成brocade ICX
查了一下資料
做個記錄

在ubuntu 12.04中

iso.3.6.1.2.1.4.22.1.2.5.192.168.101.178 = Hex-STRING: 00 0D 54 A0 A6 C9

iso.3.6.1.2.1.4.22.1.2 這一段是由snmp要撈取的固定OID

5 代表的則是這個 ip mac所在的實體port

192.168.101.178 是 mac 所對應到的ip

00 0D 54 A0 A6 C9 是机器的 mac 一定要是大寫

轉換大小寫的語法如下
echo AbcDEFg | tr a-z A-Z
ABCDEFG


iso.3.6.1.2.1.2.2.1.7.9    9 代表實体port

可使用snmp set    1:up   2:down


2013/07/02

DOS模式下測i/o批次檔

DOS模式下測io批次檔

:cp
echo %TIME% >> k:\time.txt
copy c:\abc.txt k:\abc.txt
echo %TIME% >> k:\time.txt
echo ========== >> k:\time.txt
goto cp

2013/06/27

目前 /etc/fstab都改用UUID來替代之前 /dev/sdx的方式了
如何查uuid呢
在/dev/disk下有几個目錄可以看得到

http://blog.lefthander.tw/2010/03/ubuntu-uuid.html

2013/06/24

因為有可能要做主机的升級
有資料必需要移到新机器上
之前使用clonezilla時有提供利用ssh mout遠端目錄的功能
使用的是sshfs
在centos 5.6 以上只要yum install sshfs -y
接下來

usage: sshfs [user@]host:[dir] mountpoint [options]

http://talk.away.com.tw/main/modules/weblog/details.php?blog_id=167

2013/06/20

昨天把win的log丟到log server後分析程式出現問題
就是看不到本文
所有的log變成了附件
要看的話就很麻煩
改用mutt來寄
語法跟mail其實差不多

 mutt [-a 附加檔] [-i 內文檔] [-b 秘密副本] [-c 一般副本]   [-s 信件標題] email位址 < mail內容
http://linux.vbird.org/linux_server/0380mail.php#mua_mutt

中文就ok了

2013/06/19

早上發生一台win 2012 server 出現自動重開的情況
而重開發顯示捉不到HD
mirror box的lcd則出現rebuild的訊息
把有問題的hd先拔出後
再重開
chkdsk
service壞了好几個
看了一下log
發現昨天早上就出現hd有問題
找了一下
找到
https://code.google.com/p/eventlog-to-syslog/
http://ssorc.tw/?p=1197
這個可以把win的log丟到syslog

將 evtsys.dll 及 evtsys.exe 放至 %systemroot%system32

%systemroot%system32evtsys -i -h 1.1.1.1

net start evtsys

若要uninstall

net stop evtsys
%systemroot%system32evtsys -u

在log server上就會有記錄了

但出現的是主机名稱而不是ip
coding撈資料的時候要注意一下

2013/06/04

前不久安裝了smokeping
補一下監控的部分
先裝上mail client
apt-get install mailutils

#vi /etc/smokeping/config.d/Alerts

*** Alerts ***
to = derek@faq-book.com   #設定要收到警報信件的信箱
from = faq@faq-book.com   #設定本機發信的帳號
+someloss
type = loss
# in percent
pattern = >0%,*12*,>0%,*12*,>0%
comment = loss 3 times  in a row

以下為範例

+lossdetect
 type = loss
 # in percent
 pattern = ==0%,==0%,==0%,==0%,>20%,>20%,>20%
 comment =
#說明 : 這是用來偵測突然間loss封包
 +miniloss
 type = loss
 # in percent
 pattern = >0%,*4*,>0%,*4*,>0%
 comment =
#說明 : 當連續兩個週期封包都有loss 4個或高於0%,且在第三個週期封包高於0 %的話就alert
+someloss
 type = loss
 # in percent
 pattern = >20%,>20%
 comment =
#說明 : 當連續兩個週期封包都Loss高於20% 時就alert
 +rttdetect
 type = rtt
 # in milliseconds
 pattern = <10,<10,<10,<10,<10,<100,>100,>100,>100
 comment =
#說明: 如果當前5次延遲小於10 ms,第6次小於100 ms而從第7次開始連續三次都高於100 ms的話就alert
 +rttbadstart
 type = rtt
 # in milliseconds
 pattern = >4.5,>4.5
 comment =
#說明 : 在連續兩個週期內ping值平均都高於4.5 ms時就alert

接下來要在/etc/smokeping/config.d/Targets裡
每一個要監控的device最後加上

alerts = lossdetect,miniloss  <------  加入所需要的監控條件

service smokeping restart

http://ithelp.ithome.com.tw/question/10076486

2013/06/03

早上在接某棟樓的單模光纖時發生了問題
有時在core端灯有亮 而且interface有up 但遠端灯沒亮也沒up
有時在遠端灯有亮 而且interface有up 但core灯沒亮也沒up
gbic測過也沒壞
猜測是光纖跳接線的問題
下午拿一條過去換
接上就ok了
記錄一下
mail server一直以來發生一個問題
就是user quota爆掉後
在log就會出現

r52CXO8W032653     9968 Sun Jun  2 20:33 <notification+zrdo6rzil6le@pages.facebo
                 (Deferred: local mailer (/usr/bin/procmail) exited with EX_TE)
<abc@abc.com>

看起來是因為quota 爆了之後信就會卡在queue裡而不會退信
參考了一下這個
http://phorum.vbird.org/viewtopic.php?f=2&t=15986&start=0

發現解決的方法是拉大quota 的soft和hard 並把grace調為1天
這樣user就會收到quota的告警信 而且在queue裡信超過一天就會被退掉
不會塞在queue中
設定grace的指令如下

edquota -f /dev/sda1 -t

另外之前有提到當user的quota滿了之後信會寫到 /var/spool/mail
所以也順便在 /home開了一個mailq的目錄
再 ln -s /var/spool/mail /home/mailq
這樣quota就全算在一起了

2013/05/31

aruba campus ap改成remote ap的步驟


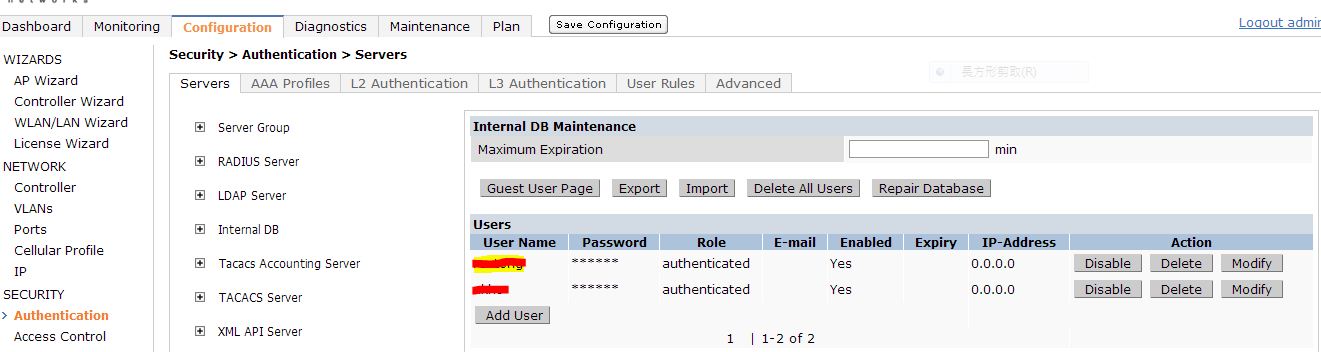
在configuration > security > authentication > internal DB
加入username password
role選擇authenticated


configuration > Advanced Services > VPN Services
加上address pool
及IKE Shared Secrets

再來
configuration > wireless > ap installation
選要改為remote ap的ap按下 provision


選擇 remote ap
打入 之前的IKE PSK
取消  Use Automatic Generation
打入 username password
重新修改ap的ip相關資料

PS 無法直接從ap的console改成remote ap 一定要先定義成campus ap再由controller改為 remote ap

2013/05/30

在設計網頁的時候常會需要插入圖片
但市面上多的是列印成pdf的虛擬印表机
還要把pdf再轉成jpg
除了不方便外還有畫質會變差
找到了這個 bullzip
除了pdf外
還可直接列印成相當多的圖檔格式
方便多了

2013/05/28

以下是如何在fortiget開啟debug並經由GUI的設定過程得到script的步驟
把script存檔
之後就可以經由修改存下來的檔案
使用ssh經由forti clinet來下指令了


http://www.fortihelp.com/2008/06/how-to-create-quick-scripts-using-gui.html
FWS 624升級firmware後client拿不到ip 的問題終於有了解答

目前使用的 FGS04302c.bin這個版本在打開dhcp snooping的時候
並不會在dhcp的封包加上option 82的訊息
但之後的版本會
如下圖所示
而封包向上流會經過cisco 3750
問題就來了 cisco預設會丟棄含有option 82的封包
但有指令可以讓cisco不做check

ip dhcp relay information trust-all (全域)

ip dhcp relay information trusted (每埠或vlan)

但目前在cisco 3750上又開啟了dhcp snooping
導致以上二個指令在這種情況是無法作用的

接下來就只剩一個解法了

在brocade的每一個port加上

no dhcp snooping relay information

讓brocade不要在封包加上option 82

問題是這個指令無法使用 int e 0/1/1 to 0/1/24 來下
要一個port 一個port下
有一千多個port 喔
想到就累 @@

2013/05/26

升到proxmox 3.0
發生一個很嚴重的問題
所有的nfs竟然都mount不上
在server上出現以下的log

May 26 06:56:00 proxmox30 pvestatd[5548]: WARNING: mount error: mount.nfs: an incorrect mount option was specified

初步看來是mount nfs是有一個option有問題
可是在proxmox的管理介面上並沒有地方可以設定mount nfs的option
應該要進os手動去改了

再仔細查了一下
因為proxmox 3.0的os已經升成debian 7.0了
而原來的要mout nfs所使用的portmap已經換成rpcbind 導致必須設定某些參數才能使用
進os手動去下mount nfs時出現

mount.nfs: rpc.statd is not running but is required for remote locking.
mount.nfs: Either use '-o nolock' to keep locks local, or start statd.
mount.nfs: an incorrect mount option was specified

而原來所使用的/etc/pve/storage.cfg並沒有設定nolock這個option
而如上所述在proxmox的管理介面上也沒有地方可以加option
只好手動來了
在/etc/pve/storage.cfg上所有有關nfs的storage上手動加上 options nolock
範例如下

nfs: nfs104_iso
        path /mnt/pve/nfs104_iso
        server 1.1.1.104
        export /mnt/vm_data/ISO
        options nolock
        content iso

reboot或是
/etc/init.d/rpcbind restart
/etc/init.d/nfs-common restart

就可以了

2013/05/23

為了監控RTT的狀況
安裝smokeping來用
之前有裝過
但移机時沒有移到 不知道到那裡去了
考慮到安裝方便性
直接使用ubuntu 12.04
os裝好後
apt-get install smokeping就ok了
但有二個問題

第一是smokeping預設要使用sendmail來發信
如果沒有裝 會有錯誤訊息
但相依性並沒有檢查到
所以要再手動
apt-get install sendmail

第二是
rrd檔的預設路徑在 /var/lib/smokeping
可是安裝時並未建立Local這個資料夾
所以要再手動建立並把owner改為smokeping.smokeping
或直接chmod -R 777

config路徑為
/etc/smokeping/config.d
主要修改Targets這個檔案就可以了

改完後一定要 service smokeping restart


2013/05/18

找到了ip geo更方便的解決方案
splunk加google map


http://danielmiessler.com/blog/visualizing-interesting-log-events-using-splunks-google-maps-application
http://cyrilwang.blogspot.tw/2012/07/splunk-google-maps.html
http://www.sepier.com/blog/data-visualized-splunk-google-maps/
之前開始使用snort來detect port scan之後
所有ip都有記錄起來
今天想到是不是可以把這些ip直接畫在地圖上
這樣出來的圖應該很美 :D
於是找到了這個網站
http://freegeoip.net/
只要把ip貼上
就可以拿到有關這個ip的相關地圖資料(包含經緯度)
使用 wget 指令

http://freegeoip.net/{format}/{ip_or_hostname}
Supported formats are csv, xml or json.

wget http://freegeoip.net/csv/$i -O ip_tmp
cat ip_tmp |cut -d "," -f 8,9 >> map
單獨取出經緯度
這樣就可以畫在地圖上了
接下來到這個網站
http://gissrv4.sinica.edu.tw/gis/tools/geocoding.aspx

把上面產生出來的map資料貼上去


大功告成

再來就是思考要怎麼自動化了

snmp oid
counter32 和counter64的區別

counter32 其能表示最大值为2^32Byte=4GB
counter64 最大值为16EB
值的概念是如果giga滿載 counter64要4000多年才能達到
但是如果是counter32的呢 giga滿載只要32秒即可達到此值 而到達後值就會reset
因此就會造成cacti出現一支一支白白的情況
建議是流量超過100MB的話一定要使用counter64
snmp v2才支援counter64
當然重點是設備要有支援


http://gaogo.blog.51cto.com/801285/1172834
在cacti使用自訂的OID時
Data Source Type要選擇GAUGE
但如果是用shell去撈出snmp的值再餵給cacti時
Data Source Type就要選擇COUNTER

2013/05/14

有關rspan的config方法如下

前提是二台switch要用trunk連結
不能使用routing模式


使用RSPAN監聽switch A連接server端的實例:
  switch A配置如下:
  !
  vlan 925
  remote-span
  monitor session 1 source interface FastEthernet1/1 both
  monitor session 1 destination remote vlan 925
  !
  switch B配置如下:
  !
  vlan 925
  remote-span
  monitor session 1 source remote vlan 925
  monitor session 1 destination interface Fastethernet 2/2

若在switch B上需要再加上一個port來monitor

則再加上


monitor session 2 source interface Gi1/1
monitor session 2 destination remote vlan 925

把 gi1/1的流量也丟到vlan 925

再把vlan 925 導出來

亦即 vlan 925視為一個pool
跨不同的switch 但所有的switch 都必須設定vlan 925且定義為remote-span
可以把所有要monitor的流量丟進去
最後再導出來

http://tc.wangchao.net.cn/bbs/detail_1628933.html

rspan無法在routing架構下使用
必須使用erspan來達成

2013/05/13

因為有一台brocade icx 6450 - 24p
每次停電復電後机器一定起不來
所以找了一台fws 624p去換下來
換下來後怪事又發生了
只有aruba controller 所在的那一段能ping到
封包完全進不了core
跟之前第二實習ap的問題完全一樣
結果今天就狠下心重開aruba controller
竟然好了
%#$%#$%#$%
xxx的aruba

2013/05/12

開始使用http://www.network-weathermap.com/
來畫出即時的流量圖
因為不想跟cacti整合
所以用stand alone來跑

以下的安裝教學還滿詳細的
http://www.cactifans.org/index.php/2011/04/cacti%E6%8F%92%E4%BB%B6%E8%AF%A6%E8%A7%A3-weathermap/

如果本來已經有裝好cacti 則要再加裝php5-gd 及php-pear
也建議先裝好cacti再來裝weathermap 因為直接使用cacti所產生的rrd資料檔來畫圖會方便許多

在執行http://xxx.xxx.xxx.xxx/weathermap/editor.php時
link的部分設定要注意的地方如下


Bandwidth要依照現實環境修改
Data Source的地方請至cacti找出要使用的port的rrd file再填入絶對路徑

此外建立link時第一個點選的node就是要使用該port資料的node
建立後在config內的資料如下


LINK node1-node2
        TARGET /var/www/html/cacti-0.8.8a/rra/1.1.1.1_traffic_in_467.rrd
        NODES 3750 7609
        BANDWIDTH 1G


請注意 TARGET /var/www/html/cacti-0.8.8a/rra/1.1.1.1_traffic_in_467.rrd
就是 3750 上要使用的port的資料(跟7609的link port)
如果發現資料流方向相反 請手動修正 NODES的順序

接下來如果依照上述文件來跑crontab

*/5 * * * * root /usr/bin/php /var/www/html/weathermap/weathermap --config /var/www/html/weathermap/configs/simple.conf --image-uri ../weathermap/test.png

我的操作結果是圖完全無法產生
但手動下指令是ok的
感覺上好像跟要使用lib的路徑有關
目前的解決方式是先寫一個shell如下


#!/bin/bash
cd /var/www/weathermap
/usr/bin/php  weathermap --config configs/simple.conf --output weathermap.png --htmloutput index.html


再用crontab跑這個shell

config有很多地方可以細調
詳細的config資料如下
http://www.network-weathermap.com/manual/latest/pages/config-reference.html#GLOBAL_FONTDEFINE

若要更換不同的ICON
要放到images這個資料夾並使用PNG檔
大小無所謂
因為config裡可以設定

以下的教學檔也不錯
http://blog.163.com/fan_yishan/blog/static/476922132010994424449/

修改圖例相對應的參數如下圖所示


2013/05/10

因為使用thunderbird
一直有個地方感覺不是很方便
就是每次回信或是寫信時對方的title及問候語都要再打一次
有點煩
找到了 Quicktext這個plugin
用起來還不錯

http://extensions.hesslow.se/extension/4/Quicktext/

2013/05/07

cisco提供二個方式來解決遠端mirror的問題
就是把遠端switch某一個port 或 vlan的流量mirror到近端來
如果是vlan架構 使用rspan
如果不是 就必須使用erspan來達成

http://www.cisco.com/en/US/docs/switches/lan/catalyst6500/ios/12.2SX/configuration/guide/span.html#wp1063324

2013/05/06

xming是一個跑在win上免費的x-win server

安裝好後
使用方式如下

先執行XLaunch
下一步二次後在以下出現的畫面上要把 no access control打勾


之後點下完成 此時xming server就會開始執行

接下來telnet 或 ssh到linux上
登入後打入以下指令

export DISPLAY=10.0.0.1:0.0

10.0.0.1是執行xming server 的windows ip

接下來就可以執行相關操作了
如 xeyes

網路上有很多教學文件
都必須利用putty
個人是覺得比較麻煩
大家參考囉

2013/05/04

今天思考了一下port scan的問題
除了之前使用psad
是否有更有效的方法來處理
找到了snort原來就有這個功能
只是default是關的
要在snort.conf打開
範例如下


# Portscan detection.  For more information, see README.sfportscan
preprocessor sfportscan: proto  { all } memcap { 10000000 } sense_level { high } logfile { /var/log/snort/portscan.log } ignore_scanners { 192.168.0.0/16,  10.0.0.0/8 } ignore_scanned { 192.168.0.0/16 }

詳細的config設定參考以下連結
http://manual.snort.org/node78.html

一樣目前打算跟LP共同運作

2013/05/02

說一下最近碰到的aruba ap的情況
有二個在同一棟大樓的ap發生ping不到的情況
原本以為是ap故障
但從controller上看ap正常工作
但從別的網段就是ping不到 改ip也不行
跟網路設備廠商討論過後認為是ap有問題導致封包送不到gateway
所以建議我換一顆
真的換一顆就好了
接下來把換下來的那顆reset為原廠default值
重新設定
到另一顆有問題的地方換上
還是ping不到
所以只好再找一顆換上
就正常了

但真的是ap有問題嗎
把這二個ap的其中一個再reset為原廠default值
重新設定
把辦公室原本正常的ap換下來
也是正常的

問了無線及網路設備廠商都無法解釋這個問題
還是無解

2013/04/30

aruba ap更換流程如下

1. ap reset為default

2.設定ip等相關資訊

3. 換上後controller會出現重複的訊息


4.進到 monitoring - all access points
   選擇重複未使用的那個ap 點選畫面最右方的 clear


2013/04/29

如何reset aruba ap 為原廠預設值


1. Connect the serial console breakout adapter cable to the AP Ethernet port and your PC/Laptop

2. Power on the AP and get into apboot mode. You'll see the option to go into AP boot mode when the AP is booting. You will have to press Enter within a 1 second window so pay attention to console messages during bootup.

3. From the apboot prompt, enter the following commands
apboot> factory_reset
apboot> purgeenv
apboot> save
apboot> boot


http://geekbuddy.blogspot.tw/2011/12/how-to-reset-aruba-networks-ap105-to.html

2013/04/21

2013/04/19

今天一直在try jw player的caption的功能
後來發現改6版後這個功能好像還沒好
又查到html 5
才知道html 5 video這個tag現在已經支援 track的功能了
語法如下

<video id="mainvideo" controls autoplay loop>
  <source src="a.mp4">
  <track src="a.vtt" srclang="en" label="English" kind="caption" default>  
  </track>
</video>

vtt的格式如下

WEBVTT

00:00:10.000 --> 00:00:12.500
aaaaaaaaaaaaaaaaaaaaaaaaaaaaaaaaaa

00:00:13.200 --> 00:00:16.900
bbbbbbbbbbbbbbbbbbbbbbbbbbbbbbbbbb.

方便

2013/04/17

今天在找能方便stream video或 audio的方法
找到以下這個軟体,看來相當方便
http://www.subsonic.org/pages/index.jsp
各平台都有


教學如下

http://santakcool.pixnet.net/blog/post/34611263-subsonic%E9%9B%B2%E7%AB%AF%E9%9F%B3%E6%A8%82%E4%BC%BA%E6%9C%8D%E5%99%A8


以下是解決30天試用的方法

https://gist.github.com/andycandet/1611509

windows的host在 windows/system32/drive/etc下

原生不支援rm 以下是解決方法

http://howto.kouwua.net/2012/03/how-to-make-subsonic-support-rm-and.html

外掛字幕還沒找到方法處理


2013/04/08

2013/4/5下午發生非預期跳電後一台poe switch沒有在復電後啟動
另外一台ap也沒起來
查了一下 dlink的poe switch並沒有壞
但從outlet接線卻又是只有訊號能過但無法供電
看來又是跟之前的狀況相同
outlet損壞
換了一顆
目前正常

2013/04/01

qm shutdown windows時會出現無法shutdown的問題
必須修改windows 的設定

  1. Start / Run / gpedit.msc
  2. Drill into Computer Configuration / Windows Settings / Security Settings / Local Policies / Security Options. Find the entry named "Shutdown: Allow system to be shut down without having to log on". Double click on it, change it to "Enabled".
  3. Drill into Computer Configuration / Administrative Templates / System. Find the entry named "Display Shutdown Event Tracker". Double click on it, change it to "Disabled".
linux則需安裝acpid

2013/03/31

eyeD3
文字介面下改mp3 id3的好工具

指令如下 一定要加--set-encoding=utf8 否則中文會有問題
eyeD3 --set-encoding=utf8 --to-v2.4 -t 中 a.mp3

http://eyed3.nicfit.net/

2013/03/30


以下這個範例是每五秒鐘reload一次iframe 而不重load整個頁面的方法

<iframe id="frame1" width="640" height="360" src="http://www.youtube.com/embed/8TeeJvcBdLA?rel=0&autoplay=1" frameborder="0" allowfullscreen></iframe>

<script type="text/javascript">
    function refreshiframe()
    {
        parent.frame1.location.href="http://www.youtube.com/embed/8TeeJvcBdLA?rel=0&autoplay=1"
        setTimeout("refreshiframe()",5000);
    }
    </script>

<body  onload="refreshiframe();">

2013/03/28

應該是有一顆ap壞了
要更換之前新ap設定如下


1. 準備一條SOE線, 並連好PC RS232 與 AP EtherNet PORT
2. 超級終端機 設定為9600,N,8,1
3.插入AP 電源後, 連按ENTER鍵 以進入 apboot mode
4. 設定指令如下:
print \\先看現有設定
setenv name AP-XXX              \\設定AP名稱
setenv group aruba-group \\設定群組
setenv master x.x.x.x               \\設定Conterller IP
setenv serverip x.x.x.x             \\設定Conterller IP
setenv ipaddr x.x.x.x               \\設定AP IP
setenv netmask 255.255.255.x           \\ 設定AP netmask
setenv gatewayip x.x.x.x           \\ 設定AP Gateway
save
5. 若是想設成DHCP則是 不加參數
setenv ipaddr
setenv netmask
setenv gatewayip

http://blog.jpps.tc.edu.tw/lifetype/post/2/1812

後記
早上花了一個早上的時間測試
switch的灯號有亮
但就是沒有poe的供電
最後使用dsp 4300測試後發現線路是fail
懷疑是outlet壞了
換一顆後目前正常
觀察中

2013/03/27

一直有user抱怨連不上ap
怪的是同一個ap上其他的机器連線都沒問題
查看了一下controller
發現這些机器的retry都很高
找了半天有沒有可以在client顯示連線狀態的工具
最後發現直接使用wireshark可能比較快
filter使用的參數如下連結

http://www.wireshark.org/docs/dfref/w/wlan.html

問題是retry太高到底是網卡有問題還是driver要更新
也有人建議把nb的blue tooth關掉會好一點
反正目前看起來最大的可能性就是aruba跟某些廠牌的網卡就是不合
XD

2013/03/25

昨天一個親戚裝ap
因為不想使用mac filter
還要維護
所以用了加密
至於要選那一個
請參考以下的連結
WEP一定不能用
WAP WAP2不要使用TKIP

http://www.techbang.com/posts/7722-adv-research-wireless-encryption-the-same-speed-iqmore

2013/03/23

一直以來在ubuntu中都是以按右鍵來rename
可是最近因為要rename大量的檔案
所以就找看看有沒有hotkey
就是“F2”啦
^.^~

2013/03/21


如何處理office365密碼複雜度的方法如下

首先,修改密碼的 PowerShell 命令為:

Set-MsolUserPassword -UserPrincipalName test@miniasp.com -NewPassword SimplePW123
但若密碼太過簡單,就會出現以下錯誤訊息:

Set-MsolUserPassword : You must choose a strong password that contains 9 to 16 characters, a combination of letters, and at least one number or symbol. Choose another password and try again.


如果要暫時解除使用者的密碼複雜度要求,可以執行以下 PowerShell 命令完成:

Set-MsolUser -UserPrincipalName test@miniasp.com -StrongPasswordRequired $False
而當我設定密碼後,會再將此設定調回來,確保使用者自行密碼重設時,可以設定一組夠強的密碼。

Set-MsolUser -UserPrincipalName test@miniasp.com -StrongPasswordRequired $True


重整一下需求:

客戶提供帳號清單,包含預設密碼
建立帳號時,須設定使用者可用預設密碼登入
使用者首次登入必須被要求變更預設密碼
使用者變更密碼時必須強迫套用 Office 365 預設的密碼複雜度要求


最後,完成一位使用者的 PowerShell 指令碼如下:

Set-MsolUser -UserPrincipalName a@a.com -StrongPasswordRequired $False
Set-MsolUserPassword -UserPrincipalName a@a.com -NewPassword 123 -ForceChangePassword $True
Set-MsolUser -UserPrincipalName a@a.com -StrongPasswordRequired $True


http://blog.miniasp.com/post/2013/03/20/Office-365-Administration-How-to-turn-off-user-password-complexity-requirement.aspx

2013/03/20

昨天朋友傳的一個好站
http://it-ebooks.info/

2013/03/18

最近因為改用dell的机器
發現某些raidon的sr 2611竟然不能使用
打電話回原廠問
得到的答案是
sr2611有二代產品
第一代速度只有sata1但開机快
第二代速度有sata2但開机慢
所以必須在bios裡把fast boot關閉 不然pc開完机sr2611還沒開完就會捉不到
但dell的bios並沒有這個選項
所以無法使用
XD
而新產品預計2013/7才會上市
殘念
某個廠商為了要解決process一直當掉的問題而要使用
http://fsl.sytes.net/watchdog.html
但是這個送到vt有11家認為有問題
送回avira的回應也是malware
我也不想設為排外
天知道有沒有問題
找到了以下的解決方案
http://www.knas.se/Applications/Restarter/Download.aspx
叫那個廠商試看看

2013/03/16

今天有朋友在g+ share了一個工具 wuinstall
直接在dos模式下指令就可以執行windows update
超方便

wuinstall /install

http://www.wuinstall.com/index.php/en/free

2013/03/14

webalizer

用來分析apache ftp squid的log
centos及ubuntu皆有收進套件
執行前要
LANG=c
否則產生的網頁會有亂碼
語法如下

webalizer -v -F squid -o /tmp/y/ access.log.1

http://www.webalizer.org/

2013/03/02

以下連結是linux實体机移轉的應注意事項及步驟
收下當參考

http://www.babyface2.com/NetAdmin/28200805server/

2013/02/19

從過年前就有台switch一直down up
原本打算觀察一陣子
過完年了還是一樣
拿了一台備品過去換
換完了還是一樣
進管理介面也看不到有那個port 異常
再仔細看了一下灯號
有個port 很異常的一直 down up
先把port disable
目前看來是正常了
再觀察看看

下次到現場先看灯號才是

20130224 後記

經過了几天的等待 user終於報修了
維修工程師到現場查看
發現網路線被user蹂躪的亂七八糟
有可能其中的某些線已經短路
造成switch的不正常
換了一條新線
再觀察看看
lftp使用sftp的方法如下

lftp sftp://root@10.0.0.1

帳號一定要打

2013/02/18

putty的ssh key放的位置

HKEY_CURRENT_USER\Software\SimonTatham\PuTTY\SshHostKeys

http://tripoverit.blogspot.tw/2007/03/clear-puttys-cache.html

2013/02/12

這段時間一直發生某些guest network down的問題
os本身還活著,但network就是down
從os看network沒有什麼問題,但就是不會通
一定要關机再開机才能恢復正常
重開机是沒有用的
感覺上好像是host os 上bridge的nic不知怎麼的而出問題
guest必須要關机再開机才能再取到一個新的bridge nic
linux win 都有發生
使用的都是rtl 8139
linux改用 intel e1000後目前看來是正常
但為什麼不是所有的guest都會發生?
上forum看了一下 好像也有人有這個問題
解決的方法都是改用e1000或是virtio
看來也只能先這樣處理了

2013/02/11

在linux上我們使用find來找檔案
在windows上用 where

where /r c:\ abc.exe

http://blog.miniasp.com/post/2010/10/24/How-to-find-executable-files-in-Windows-using-which-and-where.aspx

2013/01/18

今天有個爛廠商說nas慢是因為我的網卡error太多的原因
清掉counter再來重跑


找出網上使用的module
# ethtool -i eth0
 driver: pcnet32 [ This is the interface driver ]

Shudown interface
# ifdown eth0

移除再重加module
# modprobe -r pcnet32
# modprobe pcnet32

Startup interface
# ifdown eth0

檢查清空了沒
# ifconfig

或是直接 reboot

2013/01/17

昨天參加研討會才知道windows server 2012已經內建dedupe的功能
設定方式如下連結

http://www.dotblogs.com.tw/swater111/archive/2012/10/25/78905.aspx

opensource的解決方案
http://opendedup.org/

2013/01/15

之前本來是一直用awstats來分析maillog
但好久沒去看了
因為今天看maillog有異常
要去看的時候發現完全沒有資料
手動執行也沒有資料
找了一下資料
發現mailmgr設定簡單方便
以後就用這個了
安裝設定如下


1.下載 mailmgr-1.2.3.tar.tar
2.解壓所 tar zxvf mailmgr-1.2.3.tar.tar
3. 切換到解壓所出來的目錄
4. 執行 ./configure
5. 執行 make

要使用的檔案只有二個

mailmgr
/usr/local/etc/mailmgr.conf(這個一定要放在這個目錄下 否則就用ln)

設定
vi /usr/local/etc/mailmgr.conf

logfile /var/log/maillog # maillog檔所在
temporary_dir /tmp # 暫存檔
output_dir /var/www/html/mailmgr # 網頁輸出目錄
local-host-names /etc/mail/local-host-names # local-host-names
lastlog 0 # lastlog 預設值
overwrite_report no # 是否覆蓋舊的檔案
email_domain x.x.x.x# 設定mail domain
use_sendmail_cw yes # 是否使用sendmail

# TAG: title "text"
# Reports title.
#
title "MS70 MAILMGR - Sendmail Manager" # 設定輸出網頁的title

3. 建立html輸出目錄:mkdir /var/www/html/mailmgr

chmod 755 /var/www/html/mailmgr

記得目錄要加密碼才能開 應該不能讓所有人看到

4. 加入排程
crontab  -e

*/10 * * * *  mailmgr

每10分鐘由執行mailmgr程式


http://tw.myblog.yahoo.com/user-ji32k71j4xji4ek6/article?mid=3132&next=3079&l=f&fid=31

一直出現 Segmentation fault 先暫停了 再找原因

2013/01/10

在base的報表上還是會一直出現以下圖的畫面 無法解到sid的名字

一直都是使用snort提供的 sid-msg.map 還是有這個問題
原來是snort的rule update並不會去update sid-msg.map這個檔
所以只好手動了
onikmaster 提供了 create-sidmap.pl 這個程式 下載直接解壓就可以用了
用法如下
create-sidmap.pl /etc/snort/rule/rules > /tmp/sid-msg.map


2013/01/09

免工具
直接在chrome上輸入
chrome://net-internals/
就可以捉封包了

http://blog.longwin.com.tw/2010/11/browser-chrome-sniffer-2010/

2013/01/07

在ubuntu安裝時系統要求一定要建一個普通帳號
而這個帳號也就會有sudo的權限
但如果要把之後建的user也授予權限
就要使用以下的指令

1. 先建一個user
    adduser abc
2. 再把abc這個user加到sudo這個group
    adduser abc sudo

2013/01/05

log分析的好工具
免安裝,解壓後直接執行
執行會花一點時間 不要以為當掉了
http://cord.de/tools/squid/calamaris/

可以直接將 access.log 的時間戳記轉換成可辨識的日期時間顯示.
perl -pe 's/^\d+\.\d+/localtime($&)/e;' access.log > access_tmp.log
相當方便

http://blog.ogen.idv.tw/archives/46

原來放在adsl用來測試用的xp 壞了
一直在重開机
由於還有另一台也是放在adsl當proxy用
打算只用一台來取代
拿了一台來灌ubuntu 12.04 desktop
順便把squid也起在上面
然後裝virtual box跑win7
這樣在非ie不可的測試環境才不會有問題
在之前的proxy並沒有做認証
因此想在這次的移机順便加上ldap認証
找了一下相關資料
發現還不困難
在squid.conf中加上以下的資料
重啟就ok了


auth_param basic program /usr/lib/squid3/squid_ldap_auth -b "dc=yourcompany,dc=com"
-D "uid=some-user,ou=People,dc=yourcompany,dc=com" -w "password" -f uid=%s -h ldapserver

###squid_ldap_auth基本設定######################
auth_param basic children 5                 #認證程式數量
auth_param basic realm Web-Proxy            #Authentication realm
auth_param basic credentialsttl 1 minute    #Authentication cache time
###讓Proxy使用LDAP認証######################
acl ldap-auth proxy_auth REQUIRED
http_access allow ldap-auth


http://tw.myblog.yahoo.com/vcd025/article?mid=525

如果要測試參數有沒有問題
可以直接執行


/usr/lib/squid3/squid_ldap_auth -b "dc=yourcompany,dc=com"
-D "uid=some-user,ou=People,dc=yourcompany,dc=com" -w "password" -f uid=%s -h ldapserver


游標會在下一行閃
此時輸入
username passwd
如果出現ok
就表示成功了

順便提一下
在squid2.x的版本中設定

cache_dir null /tmp是不使用cache
可是在3.x的版本這個參數已經不能用了
必須使用
cache deny all
來達成

2013/01/04

今天在ubuntu 12.04中使用lftp時出現

Certificate verification: Not trusted 的錯誤
找了一下資料
必須在user的home目錄下設定

~/.lftp/rc
set ssl:verify-certificate no


http://anils-tips.blogspot.tw/2011/05/lftp-fatal-error-certificate.html

2012/12/25

在之前8月時有測試到bond的功能
但一直有問題
今天跟工程師聊了一下
才知道一定要使用802.3ad才不會有問題
參考資料如下
http://www.geego.com.tw/tech_support/techdocs_easy-to-increase-network-bandwidth

2012/12/23

以下二個是在linux中可以限制上下傳速度的東東
以避免在ADSL的環境中因為上傳滿載而影响到下傳的速度

wondershaper 針對網卡設限

wondershaper eth0 10000 500
                               下載    上傳

trickle 針對process設限

trickle -u 10 -d 20 firefox


2012/12/22

昨天中午不知道什麼原因lp network突然down而且一直沒起來
雖然之前有一陣子也常常發生
而且還為此寫了一個shell固定檢查網路有沒有問題
如果有就restart network
但看起來好像不是這樣
進主機去看
eth0是有起來的
network 再restart也沒用
好吧 重開機
想不到重開完後還是相同的情況
心想該不會是host os上bridge的process當了吧
init 0關机 清掉process
再boot
恢復正常
什麼怪事都有
@_@

今天鳥哥分享了EPEL這個站
如果有找不到的rpm可以到這裡看看
http://fedoraproject.org/wiki/EPEL

2012/12/21

之前裝了一台ubuntu 12.04
今天要update時發現找不到網站
dns沒解到
手動加到/etc/resolv.conf
重開後竟然又消失了
找了一下才發現必須加到
/etc/network/interfaces

auto eth0 
iface eth0 inet static  
address 192.168.1.2
netmask 255.255.255.0  
gateway 192.168.1.254
dns-nameservers 8.8.8.8 8.8.4.4

感覺上好像是因為一開始先使用dhcp後來再改成static ip的關係
為什麼之前一直沒發現
XD
開dos視窗

systeminfo

可以看到滿多東西

2012/12/20

今年長官有提到要買firewall的需求
找了一下封包產生的軟体預計拿來測throuthput

1. packet builder
http://www.colasoft.com/download/products/download_packet_builder.php

2. iperf
http://35g.tw/blog/2009/08/17/%E7%B6%B2%E8%B7%AF%E6%95%88%E8%83%BD%E6%B8%AC%E8%A9%A6%E5%B7%A5%E5%85%B7-iperf/

iperf的圖形版
http://code.google.com/p/xjperf/

目前看來iperf簡單易用

iperf –c 1.1.1.1 –w 100M –t 120 –i 10

主要是改變w的值
通常在小的值的表現會比較不好
而大的值表現會比較好
但都會有一個極限
如下圖


最近在進行在ubuntu上安裝virtualbox的測試
做為公用區電腦的計畫
剛好在更新完kernel發生一個問題
virtualbox無法啟動
出現必須
/etc/init.d/vboxdrv setup
的訊息
可是在/etc/init.d裡明明就沒有vboxdrv這個檔案
甚至整個hd裡都沒有
找了一下文件
才發現升級kernel時必須連kernel header一起安裝
安裝後再重開virtualbox就正常了

2012/12/16

如果要使用ssh來rsync又不想產生key
可以使用sshpass

http://www.cyberciti.biz/faq/noninteractive-shell-script-ssh-password-provider/

2012/12/13

ubuntu 12.04 要讓php跑起來
除了要apt-get install php5之外
還要apt-get install libapache2-mod-php5
service apache2 restart
才能正常使用

2012/12/11

今天在找如何快速清除snort database的資料

相當方便 只要改天數就好了


DELETE FROM event WHERE timestamp < DATE_SUB(NOW(),INTERVAL 200 DAY);

DELETE FROM data    USING data    LEFT OUTER JOIN event USING (sid,cid) WHERE event.sid IS NULL;
DELETE FROM iphdr   USING iphdr   LEFT OUTER JOIN event USING (sid,cid) WHERE event.sid IS NULL;
DELETE FROM icmphdr USING icmphdr LEFT OUTER JOIN event USING (sid,cid) WHERE event.sid IS NULL;
DELETE FROM tcphdr  USING tcphdr  LEFT OUTER JOIN event USING (sid,cid) WHERE event.sid IS NULL;
DELETE FROM udphdr  USING udphdr  LEFT OUTER JOIN event USING (sid,cid) WHERE event.sid IS NULL;
DELETE FROM opt     USING opt     LEFT OUTER JOIN event USING (sid,cid) WHERE event.sid IS NULL;

DELETE FROM acid_event USING acid_event LEFT OUTER JOIN event USING (sid,cid) WHERE event.sid IS NULL;
DELETE FROM ag USING acid_ag_alert AS ag LEFT OUTER JOIN event AS e ON ag.ag_sid=e.sid AND ag.ag_cid=e.cid WHERE e.sid IS NULL;

OPTIMIZE TABLE event, data, iphdr, icmphdr, tcphdr, udphdr, opt, acid_event, acid_ag_alert;


http://blog.terryburton.co.uk/2007/09/deleting-old-snort-and-base-event-data.html

2012/12/10

2012/12/11後記

升到 barnyard2-1.11 後在base又出現跟之前相同的情況
看不到特徵值的名稱
改了好多東西都沒辦法
而且目前找不到相關文件
改回之前的版本就正常barnyard2-1.9
算了 先改回來
另外
snort 2.9.4-1 一定要把 $SO_RULE_PATH打開
之前的版本預設都不用開
不然事件會都無法偵測且記錄
===========================================
自從12/6升到snort 2.9.4-1的版本後
資料庫的資料就異常的少
剛好今天在snort的blog發現
barnyard2有更新版本(新官網)
看來這個blog的訊息還滿多的(已訂rss)
所以來升級一下看看狀況會不會改善
先備份 /usr/bin/barnyard2及 /etc/barnyard2/barnyard2.conf

升級步驟如下
解壓source後進到目錄

autogen.sh


./configure --bindir=/usr/bin --sysconfdir=/etc/barnyard2 --with-mysql

make && make install

再依照原本的barnyard2.conf改一下

========barnyard2.conf===============


#
#  Barnyard2 example configuration file
#

#
# This file contains a sample barnyard2 configuration.
# You can take the following steps to create your own custom configuration:
#
#   1) Configure the variable declarations
#   2) Setup the input plugins
#   3) Setup the output plugins
#

#
# Step 1: configure the variable declarations
#

# in order to keep from having a commandline that uses every letter in the
# alphabet most configuration options are set here.

# use UTC for timestamps
#
#config utc

# set the appropriate paths to the file(s) your Snort process is using.
#
config reference_file:      /etc/snort/rule/etc/reference.config
config classification_file: /etc/snort/rule/etc/classification.config
config gen_file:            /etc/snort/rule/etc/gen-msg.map
config sid_file:            /etc/snort/rule/etc/sid-msg.map

# Set the event cache size to defined max value before recycling of event occur.
#
#
#config event_cache_size: 4096

# define dedicated references similar to that of snort.
#
#config reference: mybugs http://www.mybugs.com/?s=

# define explicit classifications similar to that of snort.
#
#config classification: shortname, short description, priority

# set the directory for any output logging
#
#config logdir: /tmp

# to ensure that any plugins requiring some level of uniqueness in their output
# the alert_with_interface_name, interface and hostname directives are provided.
# An example of usage would be to configure them to the values of the associated
# snort process whose unified files you are reading.
#
# Example:
#   For a snort process as follows:
#     snort -i eth0 -c /etc/snort.conf
#
#   Typical options would be:
#     config hostname:  thor
#     config interface: eth0
#     config alert_with_interface_name
#
#config hostname:   thor
#config interface:  eth0
config hostname:   localhost
config interface:  eth1

# enable printing of the interface name when alerting.
#
#config alert_with_interface_name

# at times snort will alert on a packet within a stream and dump that stream to
# the unified output. barnyard2 can generate output on each packet of that
# stream or the first packet only.
#
#config alert_on_each_packet_in_stream

# enable daemon mode
#
#config daemon

# make barnyard2 process chroot to directory after initialisation.
#
#config chroot: /var/spool/barnyard2

# specifiy the group or GID for barnyard2 to run as after initialisation.
#
#config set_gid: 999

# specifiy the user or UID for barnyard2 to run as after initialisation.
#
#config set_uid: 999

# specify the directory for the barnyard2 PID file.
#
#config pidpath: /var/run/by2.pid

# enable decoding of the data link (or second level headers).
#
#config decode_data_link

# dump the application data
#
#config dump_payload

# dump the application data as chars only
#
#config dump_chars_only

# enable verbose dumping of payload information in log style output plugins.
#
#config dump_payload_verbose

# enable obfuscation of logged IP addresses.
#
#config obfuscate

# enable the year being shown in timestamps
#
#config show_year

# set the umask for all files created by the barnyard2 process (eg. log files).
#
#config umask: 066

# enable verbose logging
#
#config verbose

# quiet down some of the output
#
#config quiet

# define the full waldo filepath.
#
#config waldo_file: /tmp/waldo

# specificy the maximum length of the MPLS label chain
#
#config max_mpls_labelchain_len: 64

# specify the protocol (ie ipv4, ipv6, ethernet) that is encapsulated by MPLS.
#
#config mpls_payload_type: ipv4

# set the reference network or homenet which is predominantly used by the
# log_ascii plugin.
#
#config reference_net: 192.168.0.0/24

#
# CONTINOUS MODE
#

# set the archive directory for use with continous mode
#
#config archivedir: /tmp

# when in operating in continous mode, only process new records and ignore any
# existing unified files
#
#config process_new_records_only


#
# Step 2: setup the input plugins
#

# this is not hard, only unified2 is supported ;)
input unified2


#
# Step 3: setup the output plugins
#

# alert_cef
# ----------------------------------------------------------------------------
#
# Purpose:
#  This output module provides the abilty to output alert information to a
# remote network host as well as the local host using the open standard
# Common Event Format (CEF).
#
# Arguments: host=hostname[:port], severity facility
#            arguments should be comma delimited.
#   host        - specify a remote hostname or IP with optional port number
#                 this is only specific to WIN32 (and is not yet fully supported)
#   severity    - as defined in RFC 3164 (eg. LOG_WARN, LOG_INFO)
#   facility    - as defined in RFC 3164 (eg. LOG_AUTH, LOG_LOCAL0)
#
# Examples:
#   output alert_cef
#   output alert_cef: host=192.168.10.1
#   output alert_cef: host=sysserver.com:1001
#   output alert_cef: LOG_AUTH LOG_INFO
#

# alert_bro
# ----------------------------------------------------------------------------
#
# Purpose: Send alerts to a Bro-IDS instance.
#
# Arguments: hostname:port
#
# Examples:
#   output alert_bro: 127.0.0.1:47757

# alert_fast
# ----------------------------------------------------------------------------
# Purpose: Converts data to an approximation of Snort's "fast alert" mode.
#
# Arguments: file <file>, stdout
#            arguments should be comma delimited.
#   file - specifiy alert file
#   stdout - no alert file, just print to screen
#
# Examples:
#   output alert_fast
#   output alert_fast: stdout
#
output alert_fast: stdout


# prelude: log to the Prelude Hybrid IDS system
# ----------------------------------------------------------------------------
#
# Purpose:
#  This output module provides logging to the Prelude Hybrid IDS system
#
# Arguments: profile=snort-profile
#   snort-profile   - name of the Prelude profile to use (default is snort).
#
# Snort priority to IDMEF severity mappings:
# high < medium < low < info
#
# These are the default mapped from classification.config:
# info   = 4
# low    = 3
# medium = 2
# high   = anything below medium
#
# Examples:
#   output alert_prelude
#   output alert_prelude: profile=snort-profile-name
#


# alert_syslog
# ----------------------------------------------------------------------------
#
# Purpose:
#  This output module provides the abilty to output alert information to local syslog
#
#   severity    - as defined in RFC 3164 (eg. LOG_WARN, LOG_INFO)
#   facility    - as defined in RFC 3164 (eg. LOG_AUTH, LOG_LOCAL0)
#
# Examples:
#   output alert_syslog
#   output alert_syslog: LOG_AUTH LOG_INFO
#

# syslog_full
#-------------------------------
# Available as both a log and alert output plugin.  Used to output data via TCP/UDP or LOCAL ie(syslog())
# Arguments:
#      sensor_name $sensor_name         - unique sensor name
#      server $server                   - server the device will report to
#      local                            - if defined, ignore all remote information and use syslog() to send message.
#      protocol $protocol               - protocol device will report over (tcp/udp)
#      port $port                       - destination port device will report to (default: 514)
#      delimiters $delimiters           - define a character that will delimit message sections ex:  "|", will use | as message section delimiters. (default: |)
#      separators $separators           - define field separator included in each message ex: " " ,  will use space as field separator.             (default: [:space:])
#      operation_mode $operaion_mode    - default | complete : default mode is compatible with default snort syslog message, complete prints more information such as the raw packet (hexed)
#      log_priority   $log_priority     - used by local option for syslog priority call. (man syslog(3) for supported options) (default: LOG_INFO)
#      log_facility  $log_facility      - used by local option for syslog facility call. (man syslog(3) for supported options) (default: LOG_USER)

# Usage Examples:
# output alert_syslog_full: sensor_name snortIds1-eth2, server xxx.xxx.xxx.xxx, protocol udp, port 514, operation_mode default
# output alert_syslog_full: sensor_name snortIds1-eth2, server xxx.xxx.xxx.xxx, protocol udp, port 514, operation_mode complete
# output log_syslog_full: sensor_name snortIds1-eth2, server xxx.xxx.xxx.xxx, protocol udp, port 514, operation_mode default
# output log_syslog_full: sensor_name snortIds1-eth2, server xxx.xxx.xxx.xxx, protocol udp, port 514, operation_mode complete
# output alert_syslog_full: sensor_name snortIds1-eth2, server xxx.xxx.xxx.xxx, protocol udp, port 514
# output log_syslog_full: sensor_name snortIds1-eth2, server xxx.xxx.xxx.xxx, protocol udp, port 514
# output alert_syslog_full: sensor_name snortIds1-eth2, local
# output log_syslog_full: sensor_name snortIds1-eth2, local, log_priority LOG_CRIT,log_facility LOG_CRON

# log_ascii
# ----------------------------------------------------------------------------
#
# Purpose: This output module provides the default packet logging funtionality
#
# Arguments: None.
#
# Examples:
#   output log_ascii
#


# log_tcpdump
# ----------------------------------------------------------------------------
#
# Purpose
#  This output module logs packets in binary tcpdump format
#
# Arguments:
#   The only argument is the output file name.
#
# Examples:
#   output log_tcpdump: tcpdump.log
#


# sguil
# ----------------------------------------------------------------------------
#
# Purpose: This output module provides logging ability for the sguil interface
# See doc/README.sguil
#
# Arguments: agent_port <port>, sensor_name <name>
#            arguments should be comma delimited.
#   agent_port  - explicitly set the sguil agent listening port
#                 (default: 7736)
#   sensor_name - explicitly set the sensor name
#                 (default: machine hostname)
#
# Examples:
#   output sguil
#   output sguil: agent_port=7000
#   output sguil: sensor_name=argyle
#   output sguil: agent_port=7000, sensor_name=argyle
#


# database: log to a variety of databases
# ----------------------------------------------------------------------------
#
# Purpose: This output module provides logging ability to a variety of databases
# See doc/README.database for additional information.
#
# Examples:
#   output database: log, mysql, user=root password=test dbname=db host=localhost
#   output database: alert, postgresql, user=snort dbname=snort
#   output database: log, odbc, user=snort dbname=snort
#   output database: log, mssql, dbname=snort user=snort password=test
#   output database: log, oracle, dbname=snort user=snort password=test
#
output database: alert, mysql, user=aaa password=bbb dbname=snort host=127.0.0.1


# alert_fwsam: allow blocking of IP's through remote services
# ----------------------------------------------------------------------------
# output alert_fwsam: <SnortSam Station>:<port>/<key>
#
#  <FW Mgmt Station>:  IP address or host name of the host running SnortSam.
#  <port>:         Port the remote SnortSam service listens on (default 898).
#  <key>:              Key used for authentication (encryption really)
#              of the communication to the remote service.
#
# Examples:
#
# output alert_fwsam: snortsambox/idspassword
# output alert_fwsam: fw1.domain.tld:898/mykey
# output alert_fwsam: 192.168.0.1/borderfw  192.168.1.254/wanfw
#
#
2012/12/08

今天在寫完新的網路支援頁面之後
進到http://www.google.com/intl/zh-TW/analytics/要註冊使用時
發現使用
https://sites.google.com/site/wangluzhiyuan/
竟然無法註冊
必須再加上home(如下)
https://sites.google.com/site/wangluzhiyuan/home
才能註冊成功
留一下記錄

2012/12/05

今天廠商介紹的二套好用的wireless 軟体

http://www.ekahau.com/products/heatmapper/overview.html

http://www.metageek.net/products/inssider/

http://phorum.study-area.org/index.php?topic=60793.0

12/8後記

http://www.metageek.net/docs/wireless-networking-tools/

http://www.meraki.com/products/wireless/wifi-mapper

http://www.netspotapp.com/

http://www.wolfwifi.com/index.html

(AIRMAGNET)
http://www.airmagnet.com

(EKAHAU SITE SURVEY)
http://www.ekahau.com/

(VISIWAVE SITE SURVEY)
http://www.visiwave.com


(MERITECH WIFI NETWORK SURVEY AND DESIGN)
http://www.meritechsolutions.com/


http://www.metageek.net/forums/showthread.php?3412-Top-Wireless-WiFi-Site-Survey-Software

2012/12/04


MySQL 語法匯整

1. 基礎語法

操作功能 SQL 語法
說明
建立資料庫 create database 資料庫名稱;
列出所有資料庫 show databases;
刪除資料庫 drop database 資料庫名稱;
使用資料庫 use 資料庫名稱;
建立資料表 create table 資料表名稱(
sn integer auto_increment primary key,
name char(20),
mail char(50),
home char(50),
messages char(50)
); 常用資料庫資料型態
1. INT (整數)
2. CHAR (1~255字元字串)
3. VARCHAR (不超過255字元不定長度字串)
4. TEXT (不定長度字串最多65535字元)
列出資料表欄位資訊 describe 資料表名稱;
修改資料表欄位 alter table 資料表名稱
charange column 原來欄位名稱
新欄位名稱資料型態;
新增資料表欄位 alter table 資料表名稱 add column 欄位名稱 資料型態;
刪除資料表欄位 alter table 資料表名稱 drop column 欄位名稱;
刪除資料表 drop 資料表名稱;
插入欄位資料 insert into 資料表名稱(欄位1,欄位2,欄位3,欄位4, ...... 欄位N)
values('值1','值2','值3','值4', ...... '值N');
更新修改欄位資料 update 資料表名稱 set 欄位1='值1',欄位2='值2',欄位3='值3',... 欄位N='值N'
where 條件式 (例如 sn='5' 或 name='塔司尼' );
查詢單一欄位資料 select 欄位名 from 資料表名稱;
查詢多個欄位資料 select 欄位名, 欄位名, 欄位名 from 資料表名稱;
查詢欄位資料的唯一值 select distinct 欄位名 from 資料表名稱; 重複值只列一次
查詢所有欄位資料 select * from 資料表名稱;
條件式查詢 select * from 資料表名稱 where 條件式 (例如 sn='5'); (=, <, >, !=)
條件式查詢 and select * from 資料表名稱 where 條件式1 and 條件式2;
條件式查詢 or select * from 資料表名稱 where 條件式1 or 條件式2;
查詢某一範圍 between select * from 資料表名稱 where 欄位名 between 值1 and 值2 值為數字
查詢空值欄位的資料 select * from 資料表名稱 where 欄位名 is null not null
查詢特定筆數資料 select * from 資料表名稱 limit 8, 10; 第9筆開始選取10筆
查詢結果遞增排序 select * from 資料表名稱 order by 欄位名;
查詢結果遞減排序 select * from 資料表名稱 order by 欄位名 desc ;
查詢比對字串列出單一欄位 select 欄位名 from 資料表名稱 where 欄位名 like '%字串%';
查詢比對字串列出所有欄位 select * from 資料表名稱 where 欄位名 like '%字串%';
刪除條件值資料 delete from 資料表名稱 where 條件式 (例如 sn='5' 或 id='91001' );
刪除條件值資料 delete from 資料表名稱 where 條件式1
and 條件式2;
刪除條件值資料 delete from 資料表名稱 where 條件式1 or 條件式2;
比對刪除條件值資料 delete from 資料表名稱 where 欄位名 like '%字串%';

2. 進階語法

操作功能 SQL 語法
說明
列出正在執行的行程。 show processlist;

轉貼自 http://note.drx.tw/2012/12/mysql-syntax.html

2012/11/23

cat 6的線材只要符合 TIA/EIA TSB-155 的規格
就能夠跑10G
一般在55m內
https://www.bicsi.org/double.aspx?l=3382
免費的wifi偵測工具
http://blog.soft.idv.tw/?p=780

2012/11/21